Pages

Thursday, June 21, 2012

DIY Beach Cottage Lamp


Hello sweet friends! I hope you are all doing well!

This week is just flying by, with all of the end of school activities and getting ready to go on vacation...

Summer is officially here! And so I guess it's fitting that I am {still} working on the girls' beach cottage bedroom...

I'm crossing my fingers that the room will feel like a relaxing beach retreat, with soothing aqua blues and pure white walls.

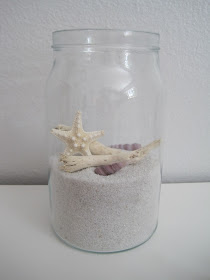
Here is a little something my husband and I made for their room:


It is our version of a clear glass lamp base found at Target, which is made to put little collectibles inside...Michelle from Emerald Cove has the Target lamp, and hers looks amazing filled with beach finds...so this got me thinking...


Could I DIY this lamp base and save a little bit of cash?
 
I wanted one that looked a little less modern for the girls' room...


The tricky part was finding a jar with a lid that was big enough. Years back we made lamps from canning jars, but I wanted something a little different this time. I found one I liked, and had a lid that would work, but the girls vetoed the jar! ;)

However, I found this jar at IKEA, and yea! It was big enough and it came with a lid! And this time, the girls approved!


{74 oz. Burken Jar with lid}


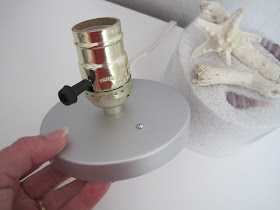
A quick trip to the home improvement store yielded a simple light socket and an extension cord. David drilled out the rivets with a small drill bit to remove the handle so the light socket could fit there instead.


He then drilled a hole in one end of light socket for the extension cord, putting a grommet in the hole and wiring it up. He drilled another hole in the middle of the lid for the light socket and bolted it to the lid.


{You can see the black grommet at the back of the light socket where the extension cord comes out.}


I filled the jar with sand, adding driftwood and miniature sand dollars in the jar for a little beach scene. {First I tried having these purple shells inside, but it didn't look right.} I put the lid back onto the jar, screwed in a light bulb, and we had a workable lamp! 


I covered a Target lamp shade with white linen, adding a ruffle at the bottom. The ruffle was not cooperating ;) and it is by no means perfect! 


{If I were to go back I would perhaps use a smaller shade with a smaller ruffle so that it shows more of the jar...I will do this next time!}


Thank you so much for stopping by and I hope you each have a beautiful weekend!

Much love,
Jenni

I am linking this to:


Thursday, June 14, 2012

"Reclaimed Wood" Headboard (Master Bedroom)


Hello everyone...How has
your week been? I sure hope it has been a lovely one. :) 


Well now...


A few weeks ago, my husband set up our new headboard that we made for my birthday present. Actually, he did most of the building while I played assistant, and then I stained it.


We followed the plans from Ana White for the queen sized Reclaimed Wood Headboard. I think it is supposed to be a knock-off of Pottery Barn's "Mason" Headboard, but with these plans you can create the look of reclaimed wood. (We used pine from Lowe's.) However, if you have salvaged wood available to you, that would make it even more special. :) The headboard plan was easy to follow, and the drawings were very well done. We highly recommend her website, and did I mention that all of her furniture plans are free, and she has them for just about everything you could want to build? I have a list as long about as my arm of things I'm dying to make...


(Headboard before it was stained. I used Cabot in "walnut".)


Making your own furniture is such a fantastic way to get the look you want for a tiny fraction of the cost.


He did such a good job on the headboard, and I love how it turned out!


 I mentioned previously that this was one of my favorite gifts he has ever given me, but it bears repeating.


He gave up two afternoons to make this headboard, and every time I look at it, it is a reminder that I am loved.


There really is something so very special about handmade gifts, don't you think? When someone takes the time and effort to make something with you in mind, it is extra sweet and personal.


It makes me want to handmake more of the things I give to others, too...


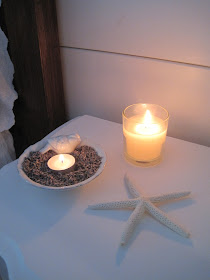
 I haven't shown a lot of our completed master bedroom, so I am showing some extra pictures of this side of the room...


Notice there are no wall decorations still...yet...


For some reason decorating this room is coming along s-l-o-w-l-y.


I am not sure whether or not to put anything above the headboard...


I may hang a couple bundles of dried flowers, such as lavender, and maybe even wheat or oats, over the headboard. Or maybe I will leave the plank wall empty...


What do you think?


I do know one thing for sure...we definitely need to make the matching footboard and sides to go along with the headboard now... ;)


Thank you so much for coming by, and I hope you have a wonderful Friday....  :)


 (I am linking this to the Wrap Up Party at   Tatertots and Jello, 
Overflowing with Creativity at It's Overflowing, Saturday Nite Special at Funky Junk Interiors, the Sunday Showcase Party at Under the Table and Dreaming, Frugal Friday at The Shabby Nest, Creative Inspirations at Embracing Change, and Creative Things Thursday at The Vintage Farmhouse.)


Blessings,
Jenni


Tuesday, June 5, 2012

Remember the chicks?


Hello sweet friends! How has your week been so far? I hope it is going well for you!

Do you remember the little chicks we brought home a few weeks ago? Well, when my friend said to take pictures every day because they grow fast, she wasn't kidding!

They are not quite as little as they were before... 


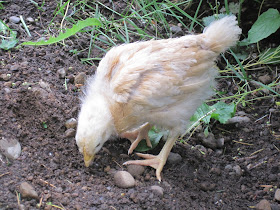
Here they are enjoying their first time outside in the yard. They can only have about ten to fifteen minutes and then they have to go back under the heat lamp, but they were so happy playing in the dirt. We hadn't weeded and mulched in this bed yet, so they lucked out!
{And they discovered worms!}


Our two Rhode Island Reds, which are about a week and a half older than the other three, and beginning to look much more like miniature hens!


So far, no roosters mistaken for hens, so they sorted them out correctly at the chicken farm! ;)

And oh, how I am loving this! My oldest daughter is the child most interested in the chicks and "farm chores". Always quick to lend a hand anyway {good characteristic!} she is extra willing to help with the babies! {This includes dealing with the more, shall we say, smelly aspects of chicken raising.}


So let me introduce you to the chicks:

Lucy is the largest of them all, and the boss. She is the mama chick for sure, and is very protective of "her" flock.


{baby photo}

She will fall asleep sometimes when I hold her and likes to have her head stroked.
 

{Lucy is the dark red one in front.}

Pumpkin is vice-president, second in charge, and defers to Lucy.


  {baby pictures}


{now}

But "top chick" not withstanding, these two are both without a doubt seen as the flock's fearless protectors...but from what I do not yet know. ;)
 
Penguin is gentle, inquisitive and very intelligent.


{baby picture}

He was the first to figure out he could go to the other side of the circular feeding trough, while the others fought over the other remaining half.


{now}

Kudos to Penguin!
Sparkler is one of our Buff Orpingtons. She is very sweet, shy, and timid in personality, and loves hanging out with Lucy and Pumpkin...


She is even more directionally challenged than me, and that's saying a lot!


{Sparkler is the chick in the front.}

Occasionally she will forget how to get back down to the lower level of their coop.
Picture my oldest daughter and I attempt to show her how to navigate her way down to no avail, Sparkler chirping loudly the whole while. At one moment of total frustration, my daughter cried, "OH! She just needs to use her brain!"

I tried to say it as respectfully and gently as possible, but let's just say Sparkler does not have an inner compass. :)
Muffin, our other Buff Orpington, is also quite sweet and the most friendly of them all so far.


{baby photo}

I have bribed her with a lot of hand-fed chicken grit, and think this may be why she loves me so much! ;) She will sit in my hand when taking a break from eating...so cute and endearing!


{now}

All in all, this is a lot of fun! It won't be long and they will be outgrowing their temporary coop {i.e., large rabbit hutch} in the garage, and will have the feathers they need to be in an outdoor coop!

So the question remains...what kind of a coop to build?

I dream of this: 


this:

{Country Living}
  
or perhaps this:

{as previously shown, from Backyard Chickens}


I think my husband is dreaming of a version much more simple and scaled down...


{via google}

{Okay, I'm joking on that last part, and with permission from my husband!} ;)

But clearly we need to choose one like mine come to a fair agreement, and soon! :)


So, which of the three first coops is your favorite?

Thank you for stopping by and I hope you have a wonderful Wednesday!

Much love,
Jenni