Hello sweet friends! I hope you are all doing well!
This week is just flying by, with all of the end of school activities and getting ready to go on vacation...
Summer is officially here! And so I guess it's fitting that I am {still} working on the girls' beach cottage bedroom...
I'm crossing my fingers that the room will feel like a relaxing beach retreat, with soothing aqua blues and pure white walls.
It is our version of a clear glass lamp base found at Target, which is made to put little collectibles inside...Michelle from Emerald Cove has the Target lamp, and hers looks amazing filled with beach finds...so this got me thinking...
Could I DIY this lamp base and save a little bit of cash?
I wanted one that looked a little less modern for the girls' room...
The tricky part was finding a jar with a lid that was big enough. Years back we made lamps from canning jars, but I wanted something a little different this time. I found one I liked, and had a lid that would work, but the girls vetoed the jar! ;)
However, I found this jar at IKEA, and yea! It was big enough and it came with a lid! And this time, the girls approved!
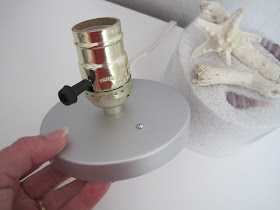
A quick trip to the home improvement store yielded a simple light socket
and an extension cord. David drilled out the rivets with a small drill bit to remove the handle so the light socket could fit there instead.
He then drilled a hole in one end of light socket for the extension cord, putting a grommet in the hole and wiring it up. He drilled another hole in the middle of the lid for the light socket and bolted it to the lid.
{You can see the black grommet at the back of the light socket where the extension cord comes out.}
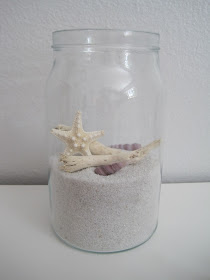
I filled the jar with sand, adding driftwood and miniature sand dollars in the jar for a little beach scene. {First I tried having these purple shells inside, but it didn't look right.} I put the lid back onto the jar, screwed in a light bulb, and we had a workable lamp!

I covered a Target lamp shade with white linen, adding a ruffle at the bottom. The ruffle was not cooperating ;) and it is by no means perfect!

{If I were to go back I would perhaps use a smaller shade with a smaller ruffle so that it shows more of the jar...I will do this next time!}

Thank you so much for stopping by and I hope you each have a beautiful weekend!
Much love,
Jenni
I am linking this to:


Jenni,
ReplyDeleteYour beach cottage lamp turned out darling. I love the shape of the jar.
(Ikea is the best!)
You and your husband are a wonderful design team!
Happy Summer! (Wasn't today's weather a gift?)
So blessed to be your blog friend.
~Lynne
w/L.
This is adorable - what a great idea. Love it :)
ReplyDeleteWhat a fantastic idea!, and a great tutorial, I love it! Thanks for sharing it, and have a great weekend!
ReplyDeleteIts gorgeous Jenni!!
ReplyDeleteSo beachy and feminine!
I hope you have a wonderful vacation...its that time of year isn't it?!
Enjoy!
Love,
Deborah xoxo
Hi Jenni,
ReplyDeleteHow are you doing?
Your beachyness is so inspiring.
Jenni I am having a giveaway please stop by and add your name to the mix.
xx
Dore
Very pretty! This reminds me of those really expensive ones from Pottery Barn.
ReplyDeleteSo pretty, Jenni! Your husband makes a wonderful assistant! Happy Sunday!
ReplyDeletexo,
Jami
That is a great idea.... thanks for the inspiration.
ReplyDeleteBristol
What a great idea. Love the lamp.
ReplyDeleteHave a nice weekend
That turned out really nice. I found this on Pinterest. :)
ReplyDeleteCute!! not to mention that is is quite easy to make one, we can also create several lamp covers to give it a new look from time to time or for every occasion.
ReplyDeleteuodfg683da
ReplyDeletegolden goose outlet
golden goose outlet
golden goose outlet
golden goose outlet
golden goose outlet
golden goose outlet
golden goose outlet
golden goose outlet
golden goose outlet
golden goose outlet