Today we’re featuring Hannah, from Turley Times! I {Belle} discovered Hannah's blog about a year ago, while reading her mother's blog, Nancy Tidbits, who we featured two days ago. Hannah and her husband recently, as within the last year, purchased a home and Hannah shares, at her blog, all the joys of home ownership. What I love about Hannah's blog is that it is well rounded. Its not just about decorating, but living and enjoying life along the way. If you've haven't visited Hannah's blog before, be sure to stop by and say hello. With that said, here is today's featured blogger. In this post, Hannah will be sharing with us a tutorial on how to make Ribbon Stars. Enjoy!
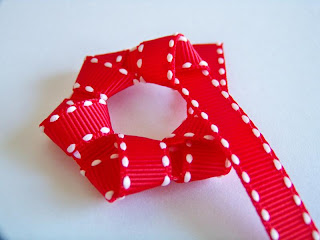
I learned how to make these ribbon star Christmas ornaments from an issue of Martha Stewart Living last fall. They are very simple and inexpensive to make - in other words, it's a craft even I can handle! All you will need is a glue gun and some ribbon. For this demonstration, I used 3/8" red and white grosgrain ribbon from Michaels.
All you are going to be doing is making six loose, flat knots so that the two ends of your ribbon will come together to form a six-pointed star. For the star I made in these photos, I cut off about a foot of ribbon from the spool. The length is going to vary depending on how loose or tight you make your knots and the width of your ribbon (the wider your ribbon, the more you will need to make each star). Make sure you have enough extra ribbon so that you can tuck the excess into the ends and glue it all together. It will require a little trial and error on your part.
Start out by making your first flat knot. Notice how I left a little extra ribbon on the end...that will get trimmed later on, but I'll leave some of it there so I can glue my ends together when I'm finished.
Then, make your second knot directly adjacent to the first knot. You don't want to leave any space between each knot so that the two ends will come full circle after you've made six knots. And make sure not to tighten your knots. They should be pretty loose...you aren't tying shoes here! :-)
Continue on with your knot making...here I've made three knots.
Four knots...
Five knots...
After the sixth knot, the two ends should be meeting each other quite nicely. At this point you will snip off the excess ribbon, leaving just enough extra to dab on a bit of hot glue and tuck it underneath your last knot. This is what a completed star should look like.
Once you've made your first star or two, you'll really start to get the hang of it and will be making tons of them because they are just so pretty and fun! Here are some of the stars I made last year.
I even dedicated an entire Christmas tree to my ribbon stars. I used little metal ornament hooks to attach mine to my tree, but you could also just stick a tree branch into the middle of each star and hang them that way.
{All photography courtesy of Hannah}
One piece of wisdom I learned last year that I will pass along to you. This is probably going to be painfully obvious to most of you, but I didn't realize this at first. If you are using ribbon that has a design printed on only one side, your stars will show only half of the design because of the way you tie the knots. I ended up making some ornaments that were half plain, half decorated because I had bought a spool of ribbon with a screenprinted design on it. It wasn't that big of a deal, but you will probably be better off using solid ribbon or ribbon that has stitching or printing on both sides.
That's it! These ornaments are a really easy way to add a little "homemade" to your Christmas tree.
Thanks again Hannah for sharing this ornament idea! To all our readers, thanks for stopping by Beautiful Nest and we hope you all have a wonderful day!




-min.jpg)





6 comments:
Those are darling! Hannah made it look so easy. I have ooodles of ribbon so no excuse not to try it. Thanks for sharing the idea!
Merry Christmas!
~Michelle
Thanks so much for asking me to be a guest blogger! It's my first time doing that so I hope I did okay. :) I think I could make those ribbon stars all day, they are so cute, so I hope I've inspired someone else to give it a whirl!
Thanks again!
Hannah
That is so cute and perfect for those little trees!
Thanks! These look like fun - will certainly give them a try. Happy Holidays!
Soooo! Cute, This would be a great project even for the young kids.
Thank you for sharing I am going to go check out Hannahs
Blog!!
xx
Cheers
Joyeux Noel
Dore
CUTE!!
Post a Comment