Dear friends, My blog has moved!
Please visit me over at my new site!


I hope to see you there!

~Jenni


Showing posts with label wreaths. Show all posts

Sunday, October 9, 2011

Doily Flowers + Yarn Wreath


 Happy Sunday to you!

Was your weekend a good one? I hope it was!

I want first to thank you for your comments on my last post~ they each meant so much to me! They truly did motivate me this weekend, and we got a lot done on the master bedroom. I feel so much better now, even about the plank ceiling! Somehow, it looks better to my eyes than it did before! So thank you for the extra push in the right direction! :)

Secondly...


Since I am finally in the mood to finish up projects, {wink} I decided I might as well finish this little project, too...Something else I'd started weeks ago, and not finished...


Partly because I am a perfectionist,

{I hear you say, "No,really!?"}


and partly because I wanted to get the doily flowers right... 
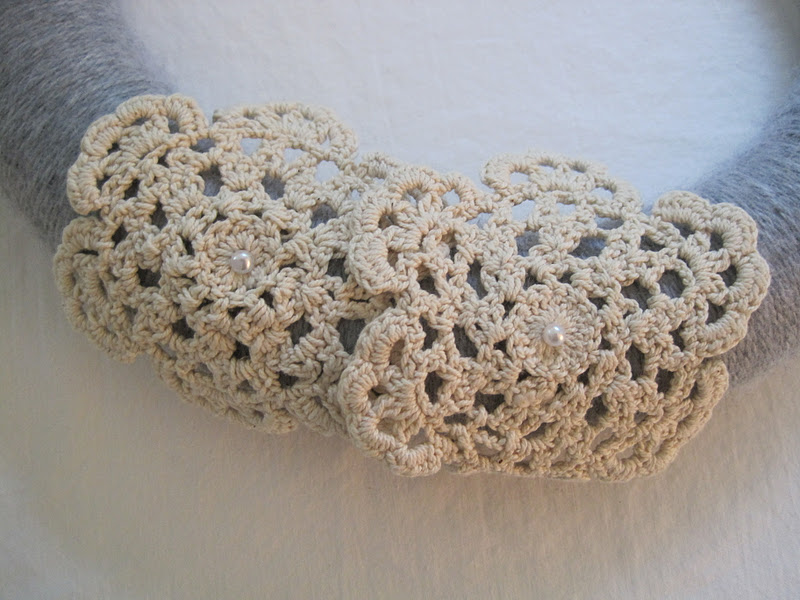


{pearl corsage pins hold the first two miniature doilies in place; they were put in an angle to avoid any sharp points poking out!}


{one doily flower}


 {a straight pin pushed down in the center of the "flower" holds it firmly in place, and a corsage pin was used next as functional decoration}


To start, I just used a white styrofoam wreath form, and wrapped the yarn around and around until it was covered...just as you would with any yarn wreath. :)


{I realized this would be a good thing to do when watching a movie...}


I decided where the lace that would hang the wreath would go...hot glue works great for this!


 And also decided I wanted my "flowers" off center on both sides.


Something about the warmness and sturdiness of the yarn with the delicate crocheted pieces just complemented each other...


Now I must confess...after repainting our living room last winter, I am still in the process of decorating the walls/deciding what I want! SO...I cheated a little here by only really showing the wreath by itself. This room is definitely a work in progress!


I will be back tomorrow with a little tutorial on making the doily flowers, just in case any one would like to make one!

{I am linking this to:

The Sunday Showcase Party at Under the Table and Dreaming 
Air Your Laundry textile party at Freckled Laundry
The Weekend Wrap Up Party at Tatertots and Jello 
Frugal Friday at The Shabby Nest


I hope you have a wonderful night, and a lovely Monday! :)


Thank you for stopping by~


Jenni


Wednesday, January 19, 2011

Ruffled Felt Heart Wreath


Hi sweet friends! I hope that this finds you having a good week!

I am sorry that I did not end up showing you this craft after all last night. I finished it on Sunday, but it's almost funny how many things have gone wrong trying to finish this post!

Now I don't know if it is this way for you, but I have found ideas are like building blocks, one on top of another. You might try something, which leads to trying something similar, yet completely different. :)

I hope you are not tired of ruffled felt wreaths, because I wanted to show you this:


As I was making the {larger} gray felt ruffled wreath, I was thinking of how I could make a similar one, only with a Valentine's theme.

I thought that a heart shape would be a good start...


{What you'll need}

12 inch gauge jewelry wire

Felt~ about one yard

Ribbon for bow

Ribbon to hang wreath

Awl

Pliers

Fabric Scissors

Glue gun/glue sticks


I used the same jewelry wire as before to make a wire heart form. The heart at this point was about 12 inches across the center. I like this wire because it is so easy to work with.


I cut three inch wide strips for this wreath...a lot of them!


And just like last time, I used an awl to create holes, spaced three inches apart.

{The amount of space between the holes you make needs to be the same as the width of the strip.}


I just kept poking holes spaced about three inches apart on each strip.


Weaving the felt onto the wire...


I kept weaving it, pushing the other folds down as I added more strips.


When it was nice and full all the way around, I twisted the wire ends together to make a knot.

{I used a length of ribbon and looped it through the wire" knot", then tied the ribbon at the end. I just slipped it around so you couldn't see the ribbon tie, and hung it up by the nice end.}


Now at first after making it, I twisted the ruffles around to make it look less streamlined and perfectly placed, like I did with the last one.

But for some reason, I didn't care for it that way. So I untwisted most of it, so the folds are fairly even.


I think it's just a matter of personal preference...

I made a large bow for it too, although I now see I didn't quite get the length right on both ends...


The complementary tilted photo...must have one of those.

{For some reason, I love angled pictures.}


A super close up photo...


If you want to read about either the miniature wreaths, or the other ruffled felt wreath, you can find that here. I just opted to do a tutorial and supply list on this post as well. :)

I am linking this to the following parties:

The Shabby Nest

The Shabby Chic Cottage

Tatertots and Jello

Freckled Laundry

Funky Junk Interiors

French Country Cottage

Under the Table And Dreaming

Thank you so much for stopping by! I hope you have a beautiful Thursday! :)

Blessings to you~

Jenni


Saturday, January 1, 2011

Miniature Linen Wreath {and a few others, too}


Hi friends!

Happy New Year to you all! I hope you are having a wonderful weekend! I don't know about you, but I am excited to see what 2011 will hold. I love the thought of another year and a fresh start. And maybe it's silly, but I always make New Year's resolutions. How about you?

Well now...Do you remember the linen wreath I made this past fall?


Well, as I was going just a little crazy making ornaments this Christmas, I thought it would be fun to try and make a miniature version of this...


{Miniature Linen Wreath}


Now, don't worry I haven't lost my marbles...I know it's not Christmas anymore. But I just had to show you this idea, because one thing so often leads to another...


{Miniature Wreath with Ticking}


{Miniature Felt Wreath}


I love miniature things. I just can't help it. And I'm thinking that these little wreaths could used any time of the year, not just as ornaments at Christmas time. :)

With the original linen wreath, I opened a wire coat hanger and formed a circle. I "poked" the linen strips though one end, and wove the linen onto the hanger. But I was curious if thick gauge wire would work. I found some at Michael's in their beading section...It is 12" gauge aluminum jewelry wire.

Now in the past year I have discovered many wonderful tools, but one of my favorite hand tools is the common awl. With a handle like a screwdriver, this tool has a sharp point that is perfect for making little holes in fabric. Any fabric. This makes fabric easy to slide onto handmade wire wreath forms, of whatever size you like...

{What you'll need}

Awl

Pliers

12" gauge jewelry wire

Fabric of choice

Glue Gun/glue sticks

Ribbon

Here is how I made my wreaths~


With a pair of pliers, I formed into about a circle, about three inches in diameter.


I cut the strips of felt about one inch wide...


And this is where the awl comes in...Make holes in the felt or other fabric with the awl, and try to make the holes about one inch apart. {You want the spaces between the holes to be the same as the width of the strips.}


Now just weave the fabric through the wire, accordion style, by way of the little holes the awl made.


Once it is nice and full all around, make a knot with your pliers.


I added a little bow to the front with my glue gun...I also tied a loop of rick rack onto the top of the wreath and slipped it between the folds of the felt, easy peasy. :)


And there you have it!


If you want a linen wreath, just follow these same instructions, but there are just two things I have to add. In the tutorial for the original linen wreath, I ripped the linen strips for extra fullness. However, for strips this small in width, I found the wreath looked way better if I cut them. Even if you cut them, linen or other cloth fabric will fray quite a bit. (Ticking frayed more than the linen.) I spent some time cutting away the strings, until I was happy with how they looked...

Okay, and here's a confession: I got further carried away with this wreath idea, and make a half-sized version of the large linen wreath, but with felt...again. The one below is eight inches in diameter~ hopefully hanging it on this shutter gives you a little perspective on it's size.


{Ruffled Felt Wreath}


It is eight inches total in diameter~ hopefully hanging it on this shutter gives you a little perspective on it's size. I think felt is such a warm and cozy fabric~ just perfect for winter. :)

You can use a thick gauge wire for this wreath as well, and it is extremely easy to work with. I do think though that if you are making anything larger than 10 inches, you would want to use a stronger wire, like a hanger, because at that point you want something that can support more weight. :) I made it the same way as the others, only the strips were 2-1/2 to 3 inches wide, and the wire circle that I began with was about six inches in diameter...

I am linking this to Freckled Laundry's "Air Your Laundry" party...If you haven't heard of this party, be sure to check it out! I love the theme, which is "Textiles" every Friday. So if you have a craft or project that includes cloth, be sure to head over and link it up to Jami's party! I always see some of the most beautiful things there...

I am also linking this to Tatertots and Jello's Weekend Wrap Up Party, Under the Table and Dreaming's Sunday Showcase Party,
and Sew Chatty. :)


Thank you so much for stopping by! :)

Have a beautiful night~

~Jenni