Dear friends, My blog has moved!
Please visit me over at my new site!


I hope to see you there!

~Jenni


Wednesday, December 29, 2010

Raspberry Jam

 Like most things, it took me, {Belle} much longer than expected to post my first attempt at canning raspberry jam last summer, but at long last here you go!

First my sons and I picked the raspberries.  


Quite honestly, this was my favorite part of the process.


It was such a rewarding experience and the kids learned a lot about raspberries.


Just look at all those raspberries. {I am so looking forward to spring!}


After the berries were picked, it was time to prepare the jam.  So I took the directions out of the box of Sure Jell and my Mom and I set out to the task ahead of us.  


While I prepared the raspberries, my Mom boiled the jars and lids.  


After I squished the berries, I used a sieve to remove a good portion of the seeds.


While I was on raspberry seed removal duty, my Mom was boiling the lids.


It was at this point everything went wrong.  Why you ask?  Well, that would be because I realized one millisecond to late that I had been reading the freezer jam directions instead of the canning ones. During the whole process, I had kept commenting to my Mom how canning was practically the same as making freezer jam.   Of course, the directions appeared similar, they were the same ones I had used the week or so before to make freezer jam.  It was one of those "a ha!" moments.  

However, everything was not a loss.  The jam did turn out, surprise, surprise, and here is a picture of the finished project.


So now you know.  Canning is simple, really simple.  Just follow the right directions.

Tuesday, December 28, 2010

Winter Snowflake Garland {with miniature doilies}


Hi friends! I hope this Tuesday finds you doing well! I just love this between Christmas and New Year's~ how about you?

Well now, ever since finding these miniature doilies at JoAnn's this past November, I have been almost obsessed with them.


{Well, okay, maybe not obsessed. But definitely loving them!}

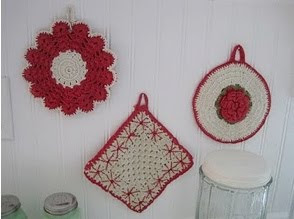
These sweet little doilies caught my eye because they reminded me of the little crocheted snowflakes my grandma would make and then starch. She gave some as a gift to us, and my mom used little clear suction cups to hang them here and there on the front window...I remember thinking as a child that there was nothing more beautiful!


{I also wanted to show you this: these miniature doilies come in both ivory and white.}


When I bought these doilies, I wasn't exactly sure what I would use them for, but found one use a couple of days later...


{When folded, they made little wings for the paper birds I was working on.}

But as I was working on the paper birds, I began to think of how cute these would be as a garland...


To make this, I decided about how many doilies I wanted to use/ how long I wanted the garland to be, and added these little metal adhesive embellishments:


I first imagined using twine for this project, but it didn't look quite right. The snowflakes needed something fuller to weave through them, and this sheer ribbon was just right. A little slippery to work with, but so worth it!


I wasn't sure how long I would need the ribbon to be, so I didn't cut it at first. I just looped the ribbon through the little doilies as I added them, making small spaces between each one.


When I'd added all of the doilies and had the right spaces between them, and I liked the amount of ribbon I had to work with on each side of the garland, I knew I could safely cut the ribbon off from the roll.


Lay your garland out and, in the middle of each space between each of the doilies, tie a small piece of matching ribbon around the ribbon connecting the doilies...


Don't make a tight knot until you have it ready to hang up, though, just in case you will need to adjust things...

{ahem...I did this, and it was really difficult to undo it...}


And once you have a tie between each doily, your garland is ready to hang up!


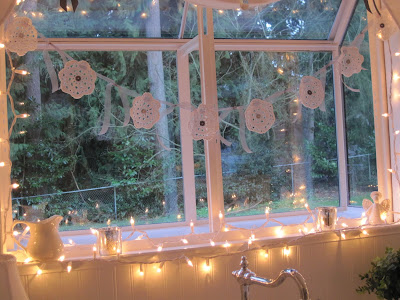
In the kitchen, I used mini clothespins sprayed white to hang each side up. I just hung it beneath my curtain, about half way up the window.

{I didn't want to remove the kitchen valance, as it is the only curtain we have in any of our main rooms at present, due to all of our renovating...}


In the living room, I hung it a little differently:


I tied it up each side and in the middle, and added bows to each part I tied up for a little extra oomph...


Now I was wavering on starching them, but decided not to. Most of the ones I was using were thicker and firmer, and I liked them better unstarched. {Personal preference.} However, I was at the bottom of the barrel by the time I was finishing the garland for the living room, and had to use a couple of more flimsy ones, and can see why you would want to starch them if this was the way they all were! And it isn't hard at all to use the starch, if you should decide to do this. Just a few mists of the spray starch, and you let it dry! :)

I admit I thought of these as my Christmas garlands, but realized they can really be used all winter long...

At least I hope they can, because I plan on doing it! ;)

So...what do you think?

Well, I hope you have a wonderful night! :)

Blessings~

Jenni

{I am linking this to Freckled Laundry and Under the Table and Dreaming.}


Sunday, December 26, 2010

The Last Candle of Advent


Hi friends! I hope your Christmas was a truly wonderful one! :)

Today is the final Sunday of the Advent season, where we light the very last candle. This candle is the most precious and sacred of all~ it is The Christ Candle.


"And the Word became flesh, and made His dwelling among us. We have seen His glory, the glory of the One and Only, who came from the Father, full of grace and truth."

~John 1:14


What Child is this, who laid to rest, On Mary's lap is sleeping?

Whom angels greet with anthems sweet, While shepherds watch are keeping?


This, this is Christ the King,

Whom shepherds guard and angels sing:

Haste, haste to bring Him laud,

The Babe, the Son of Mary.


Why lies He in such mean estate Where ox and ass are feeding?

Good Christian, fear: for sinners here The silent Word is pleading.


So bring Him incense, gold and myrrh, Come, peasant, king, to own Him;

The King of Kings salvation brings, Let loving hearts enthrone Him.


This, this is Christ the King,

Whom shepherds guard and angels sing:

Haste, haste to bring Him laud,

The Babe, the Son of Mary.


~Words by William C. Dix
(1837-1898)


"For God so loved the world that He gave His one and only Son, that whoever believes in Him shall not perish but have eternal life. For God did not send His Son into the world to condemn the world, but to save the world through Him."

~John 3: 16-17


Thank you so much for celebrating Advent with our family this Christmas, and for letting me share the lighting of each candle with you!

Merry CHRISTmas to each of you!

Blessings,

Jenni


Thursday, December 23, 2010

{Chalkboard Revisited}

A few months ago, I mentioned a project I was working on.  I knew what I wanted the finished project to look like before I began.  It just took me much longer to finish said project than I ever imagined.  

{happily ever after}

A long time ago, there was an old school chalkboard.  As a child, I used to practice my multiplication and dreaded division lessons upon it.


It used to rest upon a wall in my parents garage.


However, as the years passed and it was no longer was needed, it was removed from the wall in the garage and placed in corner space of the storage room.


Throughout the years I thought of that old school chalkboard.  Wondering where it was, and if by chance my parents still had it, and wouldn't you know they did?  What's even better is they planned to give it to me, oh yes, I was happy!  


However, to fit my motif I knew it would need a fresh coat of paint.


So, I purchased some chalkboard paint and began the process of painting.


 Here's a picture of the chalkboard after the first coat of paint was applied.  From that point, it ended up taking me almost three months to add the next three coats of paint.  


It is at this point, I have to say, that if it were not for my Dad, this project would still be in the garage waiting.  Thanks Dad!


While Dad cut the long pieces of molding into four pieces, that would soon make the frame for the chalkboard, I watched and learned.   So should I ever want to make another frame from molding, I will know what I am doing.


After the pieces of molding were cut to the correct size, I painted a coat of primer to the molding...


...and after that, I added a coat, of one of my many favorite shades, of brown paint, by Valspar.  


I had a bit of difficulty taking a photo that showed the updated chalkboard in all its new found glory, here is a close up.


Here is a photo where you can see the entire chalkboard. 


The color of the frame is best seen in the photo above. 


So at long last, this project is, ces't fini!  This is also the point, at which, I admit painting isn't my passion.  I {Belle} think I'll go back to posting about cooking fantastic dinners and my new found passion, floral arrangement.   A big thank you to Jenni {Sparrow} for the idea of using molding for the frame and to my husband for getting that heavy piece of art on the wall and off the dining room floor.  Well, that's all for now, blessings ya'll, and Merry Christmas!

simply . living . life

Monday, December 20, 2010

A Fun Craft for Kids {Reindeer Ornament}


I hope you all had a wonderful Monday! :)

Earlier today I promised you two kid's crafts. However, as both were reindeer ornaments, I decided to narrow it down to my favorite of the two. Since children are home from school this week before Christmas, they may be looking for something to do. And if they are anything like mine, there are few things they like more than making crafts! :) This craft would be suitable for school age children, and probably even preschool age, especially if you simplified it.

Children's Reindeer Ornament


{What you'll need}

Thick craft sticks (3)

Craft eyes

Red pom pom (1)~ the ones I bought were "spiky", and wouldn't stick with the school glue. Regular soft pom poms should.

Green felt (1 piece)

Brown pipe cleaners (2)

Small silver bells (2)

Small red buttons (2)

School glue

Fabric scissors and craft scissors

Glue gun/ glue sticks~ for older children and to have on hand for things that won't adhere as well with school glue.


Take three craft sticks and form them into a triangle, like this:


The triangle should face you like this, with the straight side on top. Take the two pipe cleaners and decide how long you want them to be as antlers.


Then slip a bell onto the first pipe cleaner (antler), up about 2 inches or so.


Wrap it around one of the straight sides of the triangle, with the bell on front.


Now just twist the bottom of the pipe cleaner around until it is secure and blends in with the rest of the pipe cleaner.


Form your "antler" how you like, then repeat this with the other side.


Taking your green felt, cut out (2) one inch leaf shapes:


And glue them onto your reindeer by the antlers:


Do this on both sides, then add a red button to the bottom of each leaf-shaped "ear". *The buttons might have to be done with the glue gun. Now glue the eyes and red pom pom nose on, and you should have this:


(The craft eyes I had on hand were just a little too small, so I added a silver sequin above each eye to make the eyes appear larger. I think it makes it look like a girl reindeer, perhaps Rudolph's little friend, Clarice.)

And here is your reindeer:


To attach a tie to it, I made a loop and knotted it at the bottom, gluing the knot to the back of the ornament.


And there you have it~ a fun little ornament children can make and then hang up on the tree! My kids will be making these this week as some of their Christmas gifts. :)


Well, that is all for me tonight! Thank you so much for stopping by!

Have a blessed night~

Jenni