

We were originally going to put wood plank flooring down this spring, and so last December I simply painted our kitchen floor white. I did it to make living with the existing vinyl flooring livable until the spring. However, I wasn't pleased with the products I used...So when, due to a budget crunch early this year, we realized we were going to have to put off wood flooring until next spring, I knew I was going to have to repaint the floor...I want to say a big thanks to Necel from The Old House in Texas, for sharing how she painted squares on her kitchen vinyl and inspiring me to try and do this myself! Her floor looks amazing, and it has been eight years since she painted them! This gave the fortitude to try it yet again, and I hoped for better results!
Unfortunately, the products she used are no longer available. But between her advice and the instructions I read on Do It Yourself, I set off for the hardware store. And this is the plan I came up with:
I sanded the floor with 100 grit sandpaper, then followed that with 220 grit. I scrubbed my floor throughly with soap and water, then washed it again with just water. (I didn't want any soapy residue.)
*If you are painting vinyl, make sure to use TSP, or an ammonia based cleaner. This will remove the sheen from the vinyl. Now, I opted not to use these products since my vinyl had already been painted. I was wary of what this would do to the coats of paint already on the floor...

I used Bulls Eye primer and sealer. I was looking for a high-adhesive primer that was also a sealer, but couldn't find both of those in the same primer, but no matter! It worked wonderfully! I primed the floor twice, letting it dry between coats.

(This above picture is from December, when I was priming it the first time, so you can see the way it looked before!
I used tintable porch and floor paint by Valspar, found at Lowe's. I love this stuff! You can have it mixed into almost any color they have available in their paint color aisle. I chose for them to add just a little cream color to it, to make a soft white that would match my white cabinets. I painted this base coat on three times, making sure it dried thoroughly between coats. The instructions said to wait 24 hours between coats, but I didn't always obey this rule!
I used tintable porch and floor paint by Valspar, found at Lowe's. I love this stuff! You can have it mixed into almost any color they have available in their paint color aisle. I chose for them to add just a little cream color to it, to make a soft white that would match my white cabinets. I painted this base coat on three times, making sure it dried thoroughly between coats. The instructions said to wait 24 hours between coats, but I didn't always obey this rule!

Then came the taping. A lot of taping. If you are wondering why it looks partly green already, that is because at first I lost patience with the taping and tried to free hand my next color. Uh, that didn't work out so well. So I brought out the painter's tape once again and stuck with it this time. I love (and swear by) this new green "frog tape"!
I then brought out my second color, a grayish-green tint, also in porch and floor paint. I painted the "non squares" this color, three times as well.
After this, I sealed the floor with four coats of polyurethane. I started on one side of the room, and by the time I had finished, it was time to start over. I used "Floor Finish" polyurethane made by Varathane, in semi-gloss. I wasn't intending to use a gloss, but that is the only sheen Lowe's had. I am glad I did, though. It makes it so much easier to take care of the floor, and I love the shine!


The view from the living room doorway...

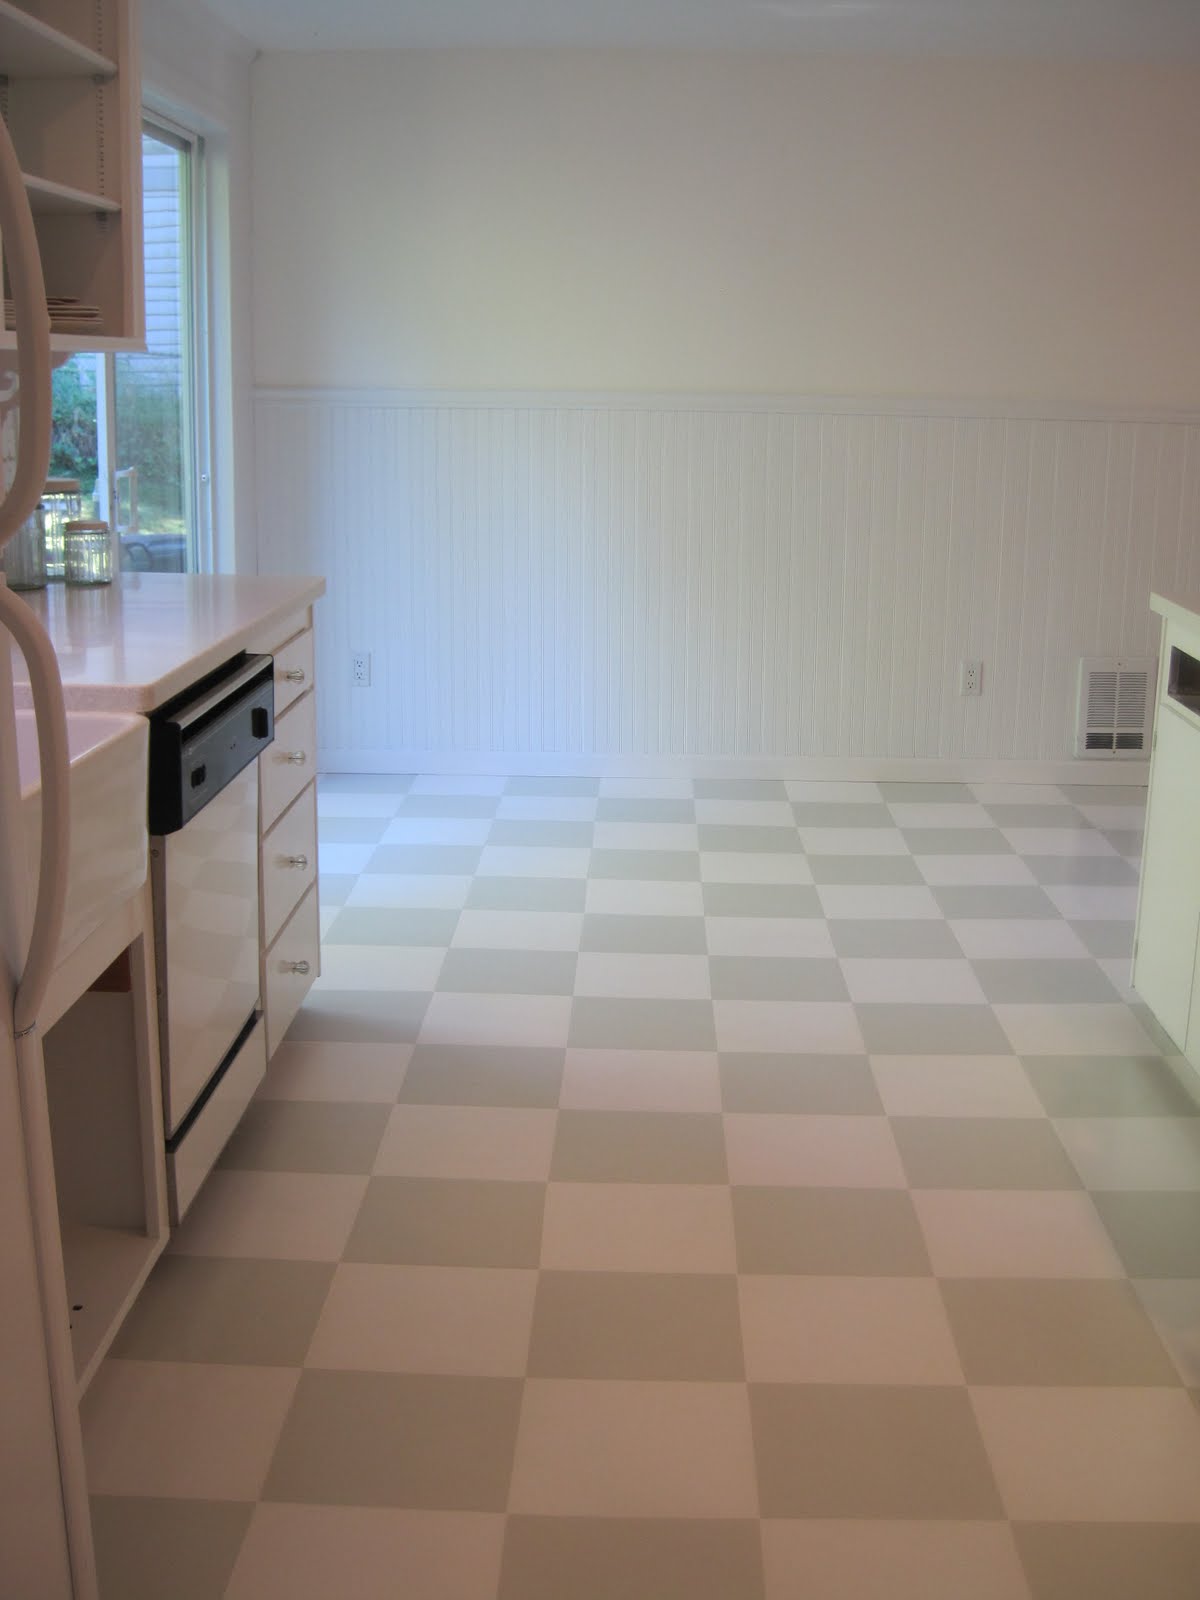

From near the dining room...

I will admit, it was a lot of work, but oh-so worth it! It is easy to keep clean, and best of all, it looks so much better than it did before! I can live happily with this floor until we can replace it! :)
Just a small disclaimer here, if you happened to see the unfinished things in my kitchen~ I am still ( yes, still!) working on this room! But I am closer than ever...really!

Well, thank you so much for stopping by! I hope you have a wonderful weekend!
Blessings,
Jenni
(P.S. I am having trouble with the font/color settings on Blogger tonight, so please excuse the weird look of this post!)
We are linking to the following parties:
1. Domestically Speaking
2. Just a Girl
3.It's A Hodgepodge Life
4.Tatertots and Jello
5.The Shabby Nest
6.The Girl Creative
7.Chic on a Shoestring Decorating
8.Funky Junk Interiors
9.My Romantic Home
10. The DIY Showoff
11. Making the World Cuter
12. Between Naps on the Porch
13. The Shabby Chic Cottage
2. Just a Girl
3.It's A Hodgepodge Life
4.Tatertots and Jello
5.The Shabby Nest
6.The Girl Creative
7.Chic on a Shoestring Decorating
8.Funky Junk Interiors
9.My Romantic Home
10. The DIY Showoff
11. Making the World Cuter
12. Between Naps on the Porch
13. The Shabby Chic Cottage


.jpg)


154 comments:
Wow, I am floored :)
Your colour choices are wonderful. A lot of work for an amazing result.
Looks GORGEOUS!! I currently have a paper-bag floor and will need to do something about that soon, but I'm with you...budget is an issue right now...
Visitng from Show and Share day. I did a similar project like this to my patio. And I would agree frog tape is the best. Your floor look amazing and I love the colors. I am your newest follower!
That looks fantastic! Much better than before, your hard work paid off!
That was a lot of work, but totally worth it! Interested in your bead board too! Did you do that yourself?
Your kitchen looks like it will be a wonderful space.
Looks outstanding and so NIFTY THRIFTY! Your beadboard just gave me a idea for making a headboard for my daughter at her condo off at college...thanks:)
Blessings,
Linda
Looks awesome, I love it!!!
What Mel said... Holy Moly I am utterly in awe! Utterly. I don't even know what to say! I absolutely love this idea! Brilliant and your floor looks amazing!
I have a question. Did you use the border of your "tile" to give border to your new tile? I have a vinyl floor(hate it)and would love to do what you did, but on a bigger scale. I am wondering if the slight border of the vinyl "tiles" will show through because the pattern that I have is not the pattern that I want. Thanks for this post and your time:)
that looks fabulous! that is alot of work, can you walk on it w/ shoes or are you afraid to? i would hate to tear that up after so much hard work! it looks fantastic!
I love how subtle the colors are. It looks great!
Jenny, this is beautiful! Thanks so much for stopping by my blog...I'm going to follow yours. :)
I'm so glad I inspired this. They look amazing and I know you are going to enjoy them for a long time.
That looks fabulous!
What a fantastic job. At first glance I thought it was vinyl flooring.
Wow Jenni that is just amazing- I love love love your kitchen so much!
Oh wow. That turned out great. I love your kitchen.
That does sound like a lot of work. But the results are amazing!
I've been contemplating doing this to my vinyl and wow it really looks greats! I'm impressed and am now a follower : ))))
AAAmazing job! Holy Cow that is a ton of work but it really does look first rate! Just beautiful!
Wow, you did so much work on this and it shows! It looks wonderful!
You go girl!
Thank you for sharing!
Leticia
that is amazing! i LOVE the colors you used and love the style. way to go!
This is BEAUTIFUL, Jenni! Oh my. So happy you gave me more than a sneak peek this time! Hmmm...I wonder if I could do something like this over my awful ceramic tile? Oh great, here comes ANOTHER project! Haha. Bravo!!!!
AMAZING! I had no idea you could do this!
This is great. Could you now come and do this to my bathroom floor?!?! Just kidding!
I am a little chicken to try this though. Maybe one day!
Love This! I am bookmarking this post right now! Stopping by from tater tots and jello. What an incredible idea! I would have never thought to paint the vinyl.
i just love that floor!!! you did a great job with everything! and I know this doesnt have anything to do with the post but I love the wood board panel looking walls you have behind the sink!
This looks amazing!! I have been wanting to do my vinyl floors in my laundry and kids broom for a while now. Thanks for the fabulous instructions and tips. I bet you come into that room and just sigh at how fabulous it looks!
This looks amazing!! I have been wanting to do my vinyl floors in my laundry and kids broom for a while now. Thanks for the fabulous instructions and tips. I bet you come into that room and just sigh at how fabulous it looks!
Wowzers - it looks fantastic! thanks for sharing.
STUNNING. makes me wish I could do that to my kitchen!
Truly Fabulous!!!!
What a difference. This looks great. I plan to do this to my downstairs bathroom.
I'll be painting my floor soon, I hope mine turns out this good! Great job!
gail
Hello,
thanks for your experience sharing, i appreciate your post. this post is really informatics and useful . If you are looking for floor refinishing, floor sanding or floor sanding essex, floor sanding kent these facilites in Lonfon you fan find more .........
Our kitchen's flooring is also vinyl tile. Indianapolis, in our place, vinyl flooring and (Indianapolis) hardwood flooring are very popular because of its simplicity. When I read this blog, I'm so amazed to the painted floorings. This time, I'm planning to remodel our kitchen's flooring. I like the checkered design.
Thanks for sharing this wonderful idea!
I just found your blog- will be back! What you did here is amazing! My dream kitchen would have the same floor- done in the gray green you used. Love it!
OMG I have the ugliest vinyl flooring and I never dreamed of painting it. Thank you so much of your step by step post. I cannot wait to try this one out...just hope it turns out as gorgeous as your floor did. I'm so inspired...Yayyyyy!
I just you via a google search and I'm so glad I did! I would like to know if you sanded between poly coats?
Your kitchen floor looks amazing, how is it holding up?
I'm painting my bathroom vinyl floor today! I was searching around for any tips and pointers and found your floor. It looks amazing!
Thanks for posting this. I followed your procedure and everything has turned out great. I just have one question. I'm ready to put the floor finish poly on and was wondering if you lightly sanded your second coat of paint before doing that?
Gregg, I did not sand the floor after painting it, before sealing it with the varethane. I think that may be the technical rule, but I broke that one! I didn't have any problem with the varethane not bonding to the paint, so I think you would be safe if you didn't sand the floor before sealing it.
Wow! This looks great! Did you use the Valspar oil or latex porch/floor paint? Looks like oil, but wanted to be sure. I'm also looking into painting my vinyl.
Jen, I actually used Valspar latex porch and floor paint. And oh, I love that stuff! It worked wonderfully on the vinyl! :)
Looks amazing! I'd just like to point out that people should test to make sure their vinyl tile doesn't contain asbestos before sanding (which releases abestos into the air).
So glad I now have hope of changing my ugly kitchen floor.
You did an amazing job!!
Thanks for sharing this!
Wow this is really amazing. You have a great talent.
Hi this looks great. How has the wear and tear on the flooring? Do you notice any scratching and/or paint chipping? Thanks Anna
Anna,
It has been two years since I painted the floor, and it has held up very well! It has scratched/chipped in a few spots when something sharp has fallen on it, but that is fairly easily remedied by lightly sanding it and then following the same process of primer, paint and varathane, if it is bothersome. I am honestly pleased with how it has turned out. :)
Thanks for stopping by and saying hello!
I love this. I have vinyl tiles on the bathroom floor of my new house which are in good condition but not to my taste. I am inspired to paint them by your blog
Fantastic! All is beautiful.
Wow, you did so much work on this and it shows! It looks wonderful! You go girl! Thank you for sharing! Leticia
What great ideas! Thanks so much for posting! I have been looking for ways to make my vinyl flooring in calgary a little more unique... These are definitely some great ideas!!! Thanks so much again for posting!
Hi - Love your floors! Just wondering did you use Latex or Oil based paint? Also how have your floors held up...now that its been almost 2 years?
Great job!
Ignore my previous comment...I obviously missed a few of the postings....my questions are already answered!
Your articles are actually inclusive signified out of respectively theme.
Floor Gurus Upstate SC
Vinyl deck has made some amazing progress from the times of the meager designed vinyl, we take up with our grandmas kitchens. Yes that same vinyl that discoloured, peeled, tore and even had the example rub off leaving those white patches all around.
I've never thought of getting vinyl flooring in Toronto and then painting it. That is such a cool idea!!
I knew this blog post was existed someplace. Thanks to post such articles. Will unquestionably be using it very soon.
I knew this blog post was existed someplace. Thanks to post such articles. Will unquestionably be using it very soon.
It is a fantastic idea of painting the vinyl floor and I am thinking to paint my home floor in some way as you have done, I like it.
painters ashburn va
Did you use an oil based polyurethane or water based? I had great luck with following your instructions until I applied the polyurethane which even though it said was a clear satin has left yellowish brown stains all over my newly painted floor. I'm not really sure how to fix this part and I'm heartbroken after spending three days painting the floor. Thanks for any advice you might be able to offer.
The info you provided in the blog that was really unique I love it!!! non slip paint
What a great blog, i am searching in Google from couple of days.Two Simple Ways to Get Traffic to Your Blog” but did not find any great way,but my search came to an end after visiting your blog.
Sports flooring
Luxury vinyl tile couldn’t be more different, not only in how it’s manufactured, but in the total aesthetic and applications.
LVT Calgary NW
Thanks for sharing such a nice and very informative post us. After reading this post i would like to do like you.
Vinyl Tile Calgary
Great blog post and pics!!!
Vinyl Flooring
Great post! Been reading tips for floor painting recently. Thanks for the info!
Thanks for this post! I'm thinking of doing some of my dining room floors like this. Thankya!
Never have I thought about painting my vinyl floors. It's actually a really good idea. you can't even tell if was a do it yourself project cause it looks so good! Thanks for sharing, I'm going to try this. Wish me luck.
http://apexfloortile.com/chicago-il-vinyl-flooring-congoleum-linoleum-flooring.htm
I did not know where that you could paint your vinyl flooring. That is awesome and that is way cool to see what you did. That is not something like I said that you could do. Way amazing and you really did such a great job.
Jak Manson | http://apexfloortile.com/chicago-il-vinyl-flooring-congoleum-linoleum-flooring.htm
Are you finding it hard to obtain good information on home improvement in hollywood fl? I found this article and thought it may be helpful to you and your readers. http://www.ablequality.com/
Getting the best price on hard wood flooring in woodstock ga can be difficult, this site has great prices though.wood flooring ac worth ga
I've been thinking about getting vinyl flooring in part of my basement for a little while now. It seems to me like it would be a good thing to have put in the wash room. Based on the pictures you've put up, it doesn't look like it will be too difficult to change the way it looks if I ever get tired of it.
Keara Littner | http://www.completefloorservice.com.au/services
I think vinyl flooring would look great in my house. We have hardwood floors right now. Would we be able to put in the vinyl flooring over the wood floor or would we have to tear up the wooden flooring?
http://www.bosscarpetonedixon.com
I think that it's an interesting idea to paint a vinyl design on a floor. These pictures look really great. I was considering hiring a contractor to instal vinyl floors in my kitchen, but I think I like painted the floor to have a vinyl design better.
Bill Li | http://www.chilliwackcarpetonechilliwack.com/
We have struggled for years in our home dealing with our peeling laminate flooring, we had enough and sought out a professional hardwood floor installer for Raleigh and Charlotte NC. United Flooring Group offered the best price and service, our floors look clean and brand new. flooring installers charlotte nc
I'm so shock of how much you can do with vinyl flooring. We have this really old vinyl, and I was going to tear it out, but I think I'm going to try this. It's the exact look I was going for when I was going to renovate anyway!
Sara Welsh | http://www.attractivefloorsnridgeville.com/vinyl
Your contents are too straightforward to browse and easy to understand.
qualityflooringatlanta.com
You could have distributed truly and so good and intensely helpful post.
Now that you have painted your vinyl floors, you are going to want to get cleaning services that specialize in cleaning these specific things. That way you do not mess up all your hard work and that it will stay as clean as the first day that you did it. Well, at least that is what I would do since I would just want to very cautious. That must have taken so much time and I know that you want to keep it looking that way for a long time.
http://www.teddyclean.com.au/vinyl-floor-buffing-polishing-restoration
This is surely a very good blog, thanks a lot for sharing such nice information here.Atlantis Tank
thanks for sharing! looks really good
Fabulous information more Haniwellsflooring offering a complete Solid Wood Flooring service in West London through our network of professional.
Make your home look lovely with Flooring in west london.
Wow! Great work! I would love to do this too on my vinyl flooring in the Philippines.
Love what you're doing here guys, keep it up!..
palm coast epoxy garage floor installers
If you are looking for a high quality solution with superior features for your flooring needs, then LG vinyl flooring is the product you should choose. Visit Tuflite.com for more details.
Multiwall Polycarbonate Sheet Suppliers
That is good to hear that Vinyl Flooring is waterproof. It sounds like vinyl would be easier to clean and maintain than some of those other options as well...!!!
Finally I’ve found your blog, awesome way of explaining each and everything really. These blogs are quite incredible that have provided the best knowledge.
Garage Flooring Contractor In New Jersey
Our long history and experience in Houston is unrivaled. Turn to us for your flooring and design solutions with superior products and craftsmanship. Houston Flooring
مؤسسة ركن الذهبية للصيانة والنظافة
ارخص شركة تنظيف منازل بالرياض تقدم شركتنا افضل الخدمات المنزلية علي الاطلاق حيث انها تقدم خدمات التنظيف المتكاملة مثل تنظيف المنازل والبيوت والفلل والقصور والمكاتب الحكومية ، كما انها تقدم خدمة تسليك المجاري وخدمة نقل الاثاث ومكافحة الحشرات ورش المبيدات وكذلك كشف التسربات وشفط البيارات
يمكنك زيارة موقعنا لانها هي الافضل علي الاطلاق حيث انها توفر كل الخدمات التي تحتاج
شركة تنظيف خزانات شرق الرياض
شركة تنظيف خزانات شمال الرياض
شركة تنظيف خزانات جنوب الرياض
شركة تنظيف خزانات غرب الرياض
شركة تنظيف سجاد شمال الرياض
شركة تنظيف سجاد شرق الرياض
شركة تنظيف سجاد جنوب الرياض
شركة تنظيف سجاد غرب الرياض
Thanks for sharing the tips for cleaning carpet at home This will be helpful forr readers Keep sharing more post like this.
best cleaner for vinyl flooring in kitchen
Very nicei really like you blog . Thanks for sharing this with us.best cleaner for vinyl flooring in kitchen
i agree is a good technique for carpet cleaning because it is completely safe for your carpet febrices.
best cleaner for vinyl flooring in kitchen
I like your blog. Thanks for sharing.
vinyls in Chennai
vinyl in chennai
vinyl flooring in Chennai
wallpaper in chennai
vinyl and wallpaper showroom in Chennai
شركة تركيب اثاث ايكيا بالرياض
تركيب ستائر بالرياض
شركة تركيب ستائر بالرياض
شركة تركيب اثاث ايكيا بالرياض
فني تركيب ستلايت بالرياض
فني تركيب ستلايت بالرياض
فني تركيب ستلايت بجدة
شركة تنظيف بالرياض
شركة تنظيف فرشات بالخرج
شركة تنظيف فرشات بالطائف
شركة تنظيف فرشات بالرياض
شركة تنظيف فرشات بالدمام
yeezy
golden goose slide
golden goose
bape hoodie
vans outlet
balenciaga shoes
michael kors bags
louboutin outlet
birkin bag
michael kors handbags
Nice post. It is really interesting. Thanks for sharing the post!
Vinyl Wood Flooring Manufacturers
اسعار الصبات الخرسانية بالرياض
يقدم المصنع حواجزه الخرسانية وغيرها من المنتجات بأسعار مذهلة، وذلك لأن مسئولي المصنع يهدفون إلى تقديم أفضل المنتجات لحماية سلامة الأفراد والمنشآت بسعر يناسب الجميع
يقدم المصنع صبات خرسانية جديدة، مثل الحواجز الخرسانية، وحواجز الطرق الخرسانية سابقة الصب، والحواجز الصخرية، وحواجز الصوت على الطرق السريعة، وحواجز صوت الجسر، وحواجز الطرق، والحواجز المقاومة للماء، وحواجز المطارات، وحواجز الأمن القوية، أحواض زهرة الأسمنت، والمصدات نيوجرسي. كروت تجميلية للطرق.
يقدم المصنع بالرياض أسعار المصنع تنافسية، فهي تناسب جميع الفئات في الرياض حتى يستمتعون بمميزات وعروض المصنع في المملكة العربية السعودية.
منتجات اسمنتية
منتجات مصنع صبات خرسانية بالرياض
حواجز أمني وصبات الخرسانة في نيو جيرسي.
الأحواض الخرسانية ومراكن خرسانية وأحواض الزراعة.
قواعد أعمدة الإنارة.
صبات وقواعد خرسانية.
كراسي خرسانية ومقاعد اسمنتية وكراسي حدائق
جميع أشكال ومقاسات مصدات سيارات والمصدات التجميلية وكور اسطوانية دائرية.
غرف التفتيش بجميع أنواعها وأحجامها للكهرباء والهاتف والمياه ومنهول صرف.
سلات مهملات خرسانية حاويات خرسانية.
سياج حدائق خرسانية، سياج كورنيش خرساني، سياج رصيف خرساني
أحواض خرساني مغسلة حديقة
صب الحواجز الخرسانية للبيع بالرياض
منتجات خرسانية
هناك أنواع عديدة من صب الحواجز الخرسانية، من أبرزها “نيوجيرسي” ، والتي تستخدم لفصل الطرق أو رسم مسارات المرور وبالمثل يمكن استخدام حاجز نيوجيرسي لحماية الناس من خطر الانحراف عن السيارات، وكذلك لحماية المنشآت.
تُستخدم صب الحواجز نيوجيرسي لفصل منطقة عن أخرى، أو للممرات المباشرة، وتُستخدم أيضًا كبنية تحتية في المدن الكبيرة، ويمكن صبها ميكانيكيًا أو تصنيعها في ورش التحضير، حواجز الطرق في نيوجيرسي قوية جدًا، لذا يمكن استخدامها في المناطق الصحراوية الحارة، لأن هذه المناطق غالبًا ما يتم حفرها واستكشافها، وبعضها قريب من الطرق، لذلك هناك حاجة إلى صب حواجز للطرق خرسانية قوية مثل حواجز نيوجيرسي.
الرياض مدينة سكنية محاطة بالمباني السكنية والمرافق العامة، ويوجد على الحدود مناظر صناعية، لذلك يجب استخدام حواجز خرسانية مختلفة لحماية الأفراد من مخاطر الحوادث المرورية من خلال الاستعانة بنا.
يوجد العديد من أنواع المصدات الخرسانية القوية التي ينتجها مصنع صبات خرسانية في الرياض لها استخدامات متنوعة، لأن هذه المصدات تستخدم في الكباري ذات الشقوق أو والتصدعات في الشوارع، فهي ليست فقط أمور أساسية في أنفاق الطرق أو الكباري نظرًا لاستخدامها لعزل جزء من النفق الذي يحتاج إلى الإصلاح، فإن الطلب على الحواجز الخرسانية هو أحد أسس الطريق.
rigid vinyl flooring tile
توجه إلى متجر السيارات القريب وأخبرهم عن طراز سيارتك وطرازها. سيكون لديهم القدرة على مساعدتك في اختيار المصباح البديل الصحيح. عندما تعود إلى المنزل ، افتح غطاء محرك سيارتك واكتشف الجزء الخلفي من المصباح الأمامي. سيكون هناك ثلاثة أسلاك تخرج من القابس مع نوع من القفل يبقيها متصلة. قم بفكها واسحب القابس من مقبسه.
صيانه مرسيدس بالرياض
صيانه بورش بالرياض
صيانة اودي
صيانه رنج روفر بالرياض
صيانه بي ام دبليو بالرياض
للبيع مكيفات
للبيع مكيفات اسبلت للبيع مكيفات اسبلت مستعمله للبيع مكيفات اسبلت مستعمله بالرياض
للبيع مكيفات شباك
للبيع مكيفات شباك مستعمله
للبيع مكيفات شباك مستعمله بالرياض
للبيع مكيفات دولابي
للبيع مكيفات دولابي مستعمله
للبيع مكيفات دولابي مستعمله بالرياض
للبيع مكيفات مخفيه
للبيع مكيفات مخفيه مستعمله
للبيع مكيفات مخفيه مستعمله بالرياض
commercial vinyl flooring sheet
This blog is good! Thank you for sharing such amazing ideas to us Please keep sharing.
Please visit Kitchens Remodeling Texas
Great Flooring Idea!
get flooring srvicrs on wholesale guideline for vinyl flooring
visit flloring guaid in a easy way.
Hey! That's a very nice post. And I really like the concept o the floors. Thanks for posting and keep posting again and again.
If you’re planning your dream kitchen, the V-MAT team is here to support you! Our kitchen vinyl mat can even modify your kitchen to make it your most favourite place at home.
Visit : Bikin Makanan
Visit : Resep
Visit : Resep Masakan
Visit : Cara Bikin Masakan
Visit : Bumbu Masakan
Visit : Cara Masak
Visit : Bikin Makanan
Hey! Thanks for posting this amazing post. You really did the great job in this post by posting colorful and beautiful pictures. I really like your post. Keep posting again and again.
Find the perfect decorative vinyl floor mats with several benefits like stain-resistance, anti-slip, durable, and easily cleanable to provide tons of style to any room.
The article written is really great
Vinyl Carpet Flooring
YOURURL.com try this website home check these guys out find more information Discover More Here
browse this site o2r13q5h74 replica louis vuitton handbags replica bags in china l4o79v2w08 my review here s1c76r0z77 best replica designer replica bags near me i4b86z0n94 replica bags seoul hermes fake y7z04g6j33 replica bags from turkey
Transformative! Painted vinyl floors elevate any space with creative charm. Concrete Refresh
vinyl flooring prices vary based on factors like quality, brand, and installation costs. Generally, vinyl flooring ranges from $2 to $10 per square foot. While luxury vinyl can cost more, it offers durability and aesthetic appeal. Consider your budget and requirements when selecting the right vinyl flooring option.
Incredibly transformative! Coated vinyl floors uplift any area with inventive allure.Concrete Refresh.
Vinyl flooring powered by blogspot
This blog is an absolute gem! Every detail about flooring types is explained thoroughly and clearly. Great job! Reds Timber Flooring is a trusted name for delivering quality Timber Flooring Osborne Park services.
What an inspiring blog! Thank you for your informative blog. It is amazing and wonderful to visit your site Professional flooring contractors Langley
Such an insightful post about Blackbutt Flooring! I particularly loved how you covered its sustainability and aesthetic appeal. This blog is a must-read for anyone considering new flooring options.
Reds Timber Flooring expert of installing and maintenance of Blackbutt Flooring in Perth.
Nice Post Visit Us
Luxury Venile Flooring Services in London
Best Venile Flooring Services in Brantford
Weaves and Knits textile add a touch of elegance and warmth to any space. Experience the perfect blend of comfort and style!
Hooded leather jackets for men are the perfect fusion of urban style and rugged durability, offering a versatile and comfortable outerwear option for any occasion.
Valuable content like this helps both beginners and experts alike.
Shoe racks
Discover the timeless charm of hardwood floors Boise. Our skilled floor installation Boise team crafts seamless, durable surfaces, while floor refinishing Boise restores worn floors to their original glory.
iyuidf733
golden goose outlet
golden goose outlet
golden goose outlet
golden goose outlet
golden goose outlet
golden goose outlet
golden goose outlet
golden goose outlet
golden goose outlet
golden goose outlet
Bathrooms are essential spaces in every home, designed for personal hygiene and daily routines. They typically include a toilet, sink, and either a shower, bathtub, or both. Beyond functionality, modern bathrooms focus on comfort and style, incorporating sleek fixtures, smart technology, and efficient layouts. Good lighting, ventilation, and storage are key for a clean and organized feel. Bathrooms can range from compact powder rooms to luxurious spa-like retreats. Whether for quick routines or relaxing soaks, they provide privacy and rejuvenation. A well-designed bathroom adds both comfort and value to a home, making it one of the most important rooms today.
https://avahome.pk/
A bathroom vanity is both a functional and stylish centerpiece of the bathroom. It typically combines a sink, countertop, and storage, helping to organize toiletries, towels, and cleaning supplies. Vanities come in various styles—from sleek modern designs with floating cabinets to traditional options with rich wood finishes and detailed hardware. The countertop can be made from granite, marble, quartz, or laminate, offering durability and aesthetic appeal. Mirrors, lighting, and faucets are often integrated to enhance usability. Choosing the right vanity can transform a bathroom, balancing beauty with practicality and making daily routines more efficient, organized, and visually pleasing.https://avahome.pk/
Rooh by Sangani’s perfume for men combines rich notes and lasting power for a truly unforgettable scent.
cool
Your floor looks amazing! I appreciate the tip about Frog Tape and letting each coat dry completely. I once rushed a similar project, and the lines were a bit messy. I wonder if adding a few more coats of polyurethane would help with long-term durability on vinyl flooring.
This is such a creative way to breathe new life into an old floor. I’ve considered doing something similar with my kitchen flooring. How long did it take for the entire project from sanding to final coat to feel completely finished?
Luxury vinyl flooring has truly evolved. Amtico’s new Form collection offers stylish, durable, and waterproof flooring perfect for homes with kids, pets, or high-traffic areas. Stylish and practical solution.
https://pasadenahardwood.com/product/#Hardwood
I love how creative you got with paint to refresh the kitchen vinyl floor. The checkerboard look feels both classic and modern.
Great insights on painted vinyl flooring! While vinyl works well for certain areas, for enhanced durability and moisture resistance, VDF is an excellent alternative. In Hyderabad, you can find professional VDF Flooring services in Hyderabad that provide high-quality flooring solutions for both commercial and residential spaces, ensuring long-lasting and robust surfaces.
Great post! I loved the creative approach to updating vinyl floors with paint. For those considering similar projects in Hyderabad, it's essential to plan for groove cutting works in Hyderabad. Proper groove cutting ensures expansion joints are correctly placed, which is crucial for preventing cracks and ensuring the longevity of the flooring, especially in regions with varying temperatures. Thanks for sharing this informative guide!
تنظيف بالوعة الحمام وشفط مياه الصرف والأمطار في شركة تسليك مجارى فى راس الخيمه ليست مجرد مهام روتينية، بل هي جزء أساسي من الحفاظ على صحة الأفراد وسلامة البيئة. من خلال اتباع الخطوات الصحيحة واستخدام الأدوات المناسبة، يمكن ضمان عمل أنظمة الصرف بكفاءة وفعالية تابع شركة شفط المجارى في ام القيوين تساهم في توفير بيئة صحية وآمنة للجميع لذا ينبغي مراعاة هذه العمليات من ضمن أولويات الصيانة المنزلية للفرد والمجتمع
Sounds like a lot of work, but the floor turned out great! I’d probably tackle a project like that in my pink carhartt jacket too.
Loved this creative vinyl floor makeover. The prep work and painting technique really show how much difference effort makes. It’s a great budget-friendly solution for refreshing a space. For homeowners planning a long-term upgrade, Granite Flooring can be a durable and elegant option that adds lasting value.
If you are looking for stylish and durable flooring, Luxury Vinyl Tile by Wisteria Lane Flooring is an excellent solution. This flooring offers the rich look of hardwood or stone while being more affordable and low maintenance. Luxury vinyl tile is scratch-resistant, moisture-friendly, and ideal for high-traffic areas. It is comfortable underfoot and works well in both residential and commercial spaces. Our luxury vinyl tile products are crafted with modern designs that fit any interior style. At Wisteria Lane Flooring, we provide flooring solutions that combine beauty and strength. You can trust our products to deliver long-term performance. Learn more about our luxury vinyl tile collection at usfmhi.com and upgrade your floors with confidence.
This is a very informative and well-structured website! I really appreciate how clearly you explained different types of epoxy flooring solutions. The details about durability and industrial applications are especially helpful for anyone planning flooring projects.
Excellent resource for anyone looking into epoxy flooring! The content is clear, informative, and easy to understand. I particularly liked how you highlighted the long-term benefits and cost considerations of epoxy floors.
Thanks for the informative content! It’s always helpful to read such well-written posts. I also found a useful site called Creative Building BD that provides excellent services in building design and epoxy flooring—worth checking out!
Amazing post! You’ve covered the topic really well. I’ve been exploring similar services lately and found Creative Building BD to be a reliable platform for construction and interior solutions. Definitely worth a visit!
Post a Comment