Dear friends, My blog has moved!
Please visit me over at my new site!


I hope to see you there!

~Jenni


Monday, January 2, 2012

{Amazing Spice Cake}


Hello friends! I hope you had a lovely New Year's weekend!

Isn't the thought of a new year such a wonderful thought? It is like one big, mysterious adventure just waiting for us! I am so excited to see what the year will hold! :)

I want to first thank you for your dear and thoughtful comments on my recent post concerning ideas for this blog. I was actually very nervous as I waited to hear what you would think! So thank you, for each and every comment touched my heart. And I am so glad to hear you think it all sounds all right! :)
 
Well now...

How about a slice of warm, straight out the oven pumpkin cake? Or perhaps banana is more to your liking, and well, that's all right, too!
It is soooo delicious with a cup of steaming hot coffee along side it, too!


And I must add, if you have the cake and the coffee, you might as well make it a thorough indulgence and include a wonderful book!
{It really can be any book, as long as you truly love it!} ;)


And the secret about this cake is that it is really more of a sweet bread. In fact, one of the reasons I love this recipe so, is that I was trying to duplicate the banana bread and the pumpkin bread found at Starbucks...only it would be fresher, and warm!

Well, this little recipe satisfied me to my heart's content! Delicious flavor and absolutely moist, down the very last crumb.


But the best part is that it is of those "one recipe, two ways" variety...The recipe came from a dear friend as Banana Spice Cake-
 but guess what? When I substituted canned pumpkin for the mashed banana, it worked entirely as well!
And I was as tickled as could be. Because one of my deep, dark secrets is that I use pumpkin all year round. Now that I have that off my chest, I am going to have to share this recipe with you! 

{I have also included a recipe for homemade buttermilk, should you not have this on hand!}

Amazing Spice Cake~ Banana OR Pumpkin 

2 1/2 cups flour
1 2/3 cups granulated sugar
1 1/4 teaspoon baking powder
1 1/4 teaspoon baking soda
1 teaspoon salt
1 1/2 teaspoons cinnamon
3/4 teaspoon nutmeg
1/2 teaspoon whole cloves
1/2 teaspoon ginger {for pumpkin cake}


2/3 cup butter, softened
2 eggs
*2/3 cup buttermilk
1 1/4 cup mashed banana OR 1 1/4 cup canned {or pureed} pumpkin
1 teaspoon vanilla extract


*Making your own buttermilk is so easy! Using a measuring cup for liquids, first add a teaspoon of either white vinegar or lemon juice. Then add milk to the one cup line. Stir it well, and let it stand for ten minutes. This will keep refrigerated in a covered jar or other container for one week. It is the best if made with whole milk, but you can use 1% or 2 % if desired. Let it stand for 15 minutes. Store as above.

Mix the dry ingredients together first, then add the remaining ingredients. Stir for 30 seconds on low, then beat for 2 minutes on medium speed. Pour into a greased and floured 9 x 13 inch pan, and bake for 40 minutes.

Alternatively, you can mix the ingredients in a bowl if you prefer! I just love the convenience of the mixer!

{Grab a hot cup of coffee or tea and a book!}

Oh, and the book I chose?


This is my favorite book on decorating! It won't be long before it has dog eared pages, it is just that beloved!


Which book would you choose?


I hope you have a beautiful Tuesday!

Much love,
Jenni


Sunday, January 1, 2012

{The final Advent candle}


First off, a little disclaimer! 


 It is tradition to light the fifth candle on Christmas Day, which is what we do in our family. However, when posting on the Advent candles, I like to do this on the Sunday following Christmas Day. This way, each candle has its own day. And so we light the fifth and final candle today...


This last candle is the most important, and this is the Jesus candle. By lighting this last candle we recognize that His coming is the fulfillment of the prophecies concerning Him. 
 
I love this symbolism! On the first Sunday of Advent, we lit the prophecy candle: remembering the many times it was foretold that a Messiah would come to us, for us.

Now we find we have come full circle, from the promise to the fulfillment of every one of those promises! And we have just that in Jesus Christ! 


Down to the last detail, He met the criteria for what was told of the coming Messiah, from His birth to His death to His resurrection.

"Surely He took up our infirmities and carried our sorrows, yet we considered Him stricken by God, smitten by Him, and afflicted. But He was pierced for our transgressions, he was crushed for our iniquities; the punishment that brought us peace was upon Him, and by His wounds we are healed."   

~Isaiah 53:4-5

Below is a song that touched my heart so much, I wanted to share it with you here...


Thank you for joining me for the lighting of the fifth candle of Advent! {And Happy New Year to you!}

Blessings,
Jenni

Friday, December 30, 2011

Some Changes Here At {Beautiful Nest}


A very Happy {almost} New Year's to you all! I can't believe how quickly this year went by, how about you?

This time of year usually brings about contemplation and refection in a lot of us, as we look back at the year we're leaving behind.

I have been doing a lot of thinking for the past few months, about this blog and some changes I would like to make, if I could just be brave. ;) 

There is one change that makes me sad: My sister {Belle} is making the switch from co-blogger here at {Beautiful Nest} to an occasional contributor. She began homeschooling her two oldest sons this year, and has her hands very full right now. She's realized she needs to focus on that right now, and I completely understand and support her in this...though I will miss sharing this blog with her!

However this lead to an important question: What do I want to do with this blog?


It helped to step back and take a good look at who I really am, and what I am not. I know this sounds weird, but let me explain...


In just the last two and a half years, I have learned how to do things I had to ask my husband to do in the past- things such as installing bead board and using power tools! And it gives such a wonderful feeling of confidence and independence! To be able to say, I want to do this, and do it myself, on my own time table! I am still learning, and have so far to go, but this is such a big part of who I am and has allowed me to do so much on our little house! And it is addicting!


{Photo courtesy of Better Homes and Gardens}

One thing that has been percolating since we started {Beautiful Nest} is a desire to show in-depth tutorials on how to do various home improvement tasks and projects. These things may be as simple as how to use a cordless screwdriver or as intimidating as laying a subfloor. I don't claim to be an expert on any of this~ rather I would be showing what I have learned, as I learn it. 


Not every one will be interested in detailed instructions on how to install a faucet, however, so these will be available by clicking on a tab to bring up all the tutorials done on this. {Versus popping up as new posts on the main blog page.} You will be able to do a search to bring up certain projects, as well.


This is just one facet of what I want to do, something I want to add! There will still be posts on decorating, home projects, homemade cleaning products, crafts, and baking, just like before! :)


Also...For a while now, I have wanted to transfer over to Wordpress.

{I feel almost like a traitor writing those words out on a Blogger site...}

 But, in all honesty, I love their clean and streamlined look, and just feel that making the move would be a good thing for this blog! My husband and son are working on moving everyone and everything safely over to Wordpress, so I don't leave anyone behind! :)


But I must tell you one more thing! I would like to change the name of this blog, but am worried over how you may feel regarding this! You see, neither my sister nor I ever truly loved the name we chose~ it was just a way to combine the names of the blogs we each had at the time.


I have a name and I think it fits very well, even better in fact...but what do you think of the idea of a name change? {I covet your thoughts on this!}


{This will not be a different blog, but rather the same theme, with a lot more content! And everything will be organized in a way that is easily accessible.}

So now I will wait on your feedback, however nervously! ;)
I hope you have a wonderful and very safe New Year's weekend! 
Blessings to each of you,
Jenni


{Photos were taken by me, unless otherwise indicated!}  :)

Monday, December 26, 2011

Celebrating Advent {The Angel Candle}


Merry Christmas! 

I hope that this Christmas weekend has been a wonderful, and very blessed, one for each of you!

Today marks the fourth Sunday of Advent, and we light the fourth candle...


The Angel Candle

And the angel said to her, "Do not be afraid, Mary, for you have found favor with God. And behold, you will conceive in your womb and bear a son, and you shall call His name Jesus. He will be great and will be called the Son of the Most High. And the Lord God will give to Him the throne of his father David, and He will reign over the house of Jacob forever, and of His kingdom there will be no end."

 Luke 1:30-33

Mary's initial response is just as you'd expect: "How can this be?" She is a young girl, engaged but not yet married, to Joseph. So it was a natural question, and it would have been my first one, too!

She is puzzled at first, because what the angel has said seems so impossible, given the circumstances. But what she finds is what we continue to discover: that God can do anything.

When it comes to thinking outside the box, God has the patent, so to speak! Mary would bear a son, but it would be by His power, and not the standard process. It can be summed up in the last part of the angel's answer: "For nothing will be impossible with God."


Angels from the realms of glory,
Wing your flight o’er all the earth;
Ye who sang creation’s story
Now proclaim Messiah’s birth.


Come and worship, come and worship,
Worship Christ, the newborn King.

Shepherds, in the field abiding, Watching o’er your flocks by night,
God with us is now residing;
Yonder shines the infant light:


Saints, before the altar bending,
Watching long in hope and fear;
Suddenly the Lord, descending,
In His temple shall appear.


Sinners, wrung with true repentance,
Doomed for guilt to endless pains,
Justice now revokes the sentence,
Mercy calls you; break your chains.


Though an Infant now we view Him,
He shall fill His Father’s throne,
Gather all the nations to Him;
Every knee shall then bow down:


All creation, join in praising
God, the Father, Spirit, Son,
Evermore your voices raising
To th’eternal Three in One.


Lord of Heaven, we adore Thee,
God the Father, God the Son,
God the Spirit, One in glory,
On the same eternal throne.
Hallelujah! Hallelujah!
Lord of Heaven, Three in One.


Come and worship, come and worship,
Worship Christ, the newborn King.

~Angels From the Realms of Glory
Public Domain


Thank you for lighting the Angel candle with me, and I hope you have a good night and a wonderful Monday!


Blessings,
Jenni

Friday, December 23, 2011

Make a Reindeer {A cute children's craft}


A very happy two days before Christmas to you all! I hope this finds you doing well! :)

I have a cute little craft to show you for the kids, something to keep them busy while they wait for Christmas Day! This one is ideal for elementary school ages and older. 


 {Clothespin Reindeer} 


What you'll need for each reindeer:


3 "no-roll" clothespins
Two red sequins
Green and red felt
Ribbon to hang ornament
Small wiggly eyes
 *Tacky Glue/Elmer's glue or glue gun/glue sticks

*If they are old enough to use a low temp glue gun, or if an adult can help them, that works better than the Elmer's glue we first tried. My kids and I switched to using the glue gun! But Elmer's glue does work, if you have patience to allow for the extra drying time. I have heard fantastic things about "Tacky Glue", so if you have younger children, that might be the best route!


To make this ornament, first take two of the three clothespins and glue them together.


Then glue one side of the very top of the third clothespin, pressing it onto the other two clothespins you glued together, like this:


Next glue on the wiggly eyes and a red sequin for a nose


Now it's time to cut a piece of felt to glue over the reindeer back...I cut mine into kind of a "band aid" shape, but a rectangle works, too! :)


 Then just glue it onto your reindeer like so:


Next up are the reindeer's ears, which are meant to look at little like leaves, and a red sequin between them. See how it looks like holly leaves and berries?


 But what would a reindeer be without a tail?


I just love these pom poms, and we used them for ours. However, these have to be glued on with the glue gun, so if you are using Tacky glue or Elmer's glue, regular pom poms work just great!


 Now just glue your pom pom to the back of the reindeer,and add a ribbon tie to it.


{I just made a loop of ribbon and tied it together, and glued the tied knot in between the back of his antlers...}


And there you have it! A fun little reindeer ornament your kids can hang on the tree!
Thank you for stopping by and I hope you all have a wonderful day! I am going to be wrapping some gifts and baking more today! How are you spending these last days before Christmas? 
Blessings,
Jenni

Wednesday, December 21, 2011

Guest Post {Erin from Peony Wire Works}

 Hi dear friends! I hope this last week before Christmas is going well for each of you!

I am excited to have my friend Erin from Peony Wire Works here today to share her tutorial of an amazing ornament she came up with!


Hello All!  I am so happy that Jenni asked me to do another ornament tutorial...she has started a new tradition for me and those I gift at Christmas time(so thank you Jenni!!).  I am so glad to be here today and hope you love this ornament, I know I do.

What you will need:
-Sheet music
-Chip board
-Mod Podge
-Glitter
-Burlap
-Ink pad
-Sponge Applicator
-Fancy scissors(and regular)
-Hot glue gun(have lots of sticks at the ready)
-Stencil for Monogram(I use about and 1 1/2 inch size)
-String

First, pick a round size that you want your ornament to be.  I chose a Dora cup because it is bigger at one end and smaller at the other, and it's what I had on hand.  Next, trace the top of your cup and the bottom of your cup on Chip board.  And trace them again on to the music sheet.  Cut all of those out.


For the smaller circle, Mod Podge the BACK of the sheet music only to the smaller Chipboard circle. No need to use a lot of Mod Podge, just cover the surface. Set that aside and let it dry. For the bigger circle, cut a piece of burlap so that there is about 1/2 overlap.  Mod Podge this to the chipboard(I like old shirt boxes because the burlap and brown of the chipboard are about the same color), and hot glue the edges of the burlap to the back of the chipboard.  Set aside let it dry.

Pick the smaller circle back up and decide how you want it monogrammed.  I like the sheet music facing me like I am reading it and put my stencil on.  Take the sponge applicator and blot it on your ink pad several times.  Then blot the applicator over your stencil(I chose ink over paint for drying and Mod Podge purposes), while holding the stencil and circle down firmly.  After this has dried(I usually wait 10 minutes), apply a light coat of Mod Podge over the entire surface and glitter with translucent glitter.  Yep, set that aside to dry.

Grab your sheet music once more(a whole sheet or half sheet lengthwise).  You want to place your cup (biggest end down)on the paper and measure out about 1/4-1/2 inch.  Then you want to eyeball that size the whole length of the paper.  This will be your fan.  I liked folding my edges and tearing it to size for some, and for others, I cut my edges with my "fancy scissors".  Once you have the page torn lengthwise to your specifications, you are going to fold it like a fan(my folds were approximately 1/4", and I did about 20 folds).


After you have done that, take your folded page and fold it in half one way(making sure the edges meet nicely) and then take it and fold it the other way(again, edges meeting nicely).  Take your hot glue gun and run a bead on half of one sides fold.  Press those together and hold for a few seconds.  Then take the other open fold and run a bead of hot glue on half of the fold again, press and hold.  Voila!  You now have a fanned circle.


Put hot glue all over the back of the burlaped circle and place this on your music sheet fan however you think looks best.


Finally, hot glue all over the back of the glittery monogram circle, and place that on the base of burlap and fan.  Measure out your string for hanging, and glue it in the back of your fan blades.  You now have a nice monogrammed ornament to give to someone special!


Here is a variation that I did, and it turned out to be my favorite...gotta have some Wire in there!


I just want to say thanks again to Jenni for inviting me to share this project with you, I am honored and happy to share.  Merry Christmas to you all!
Erin


Thank you so much for sharing this with us, Erin! It is one of the cutest ornament ideas I've seen! What a fun craft to make for one's own tree, or the perfect gift for a loved one!
Here is a sampling of the amazing wire creations Erin whips up:


 {set of notion jars}


 {wire cloche}


{The Lovely}
 
 
{Such a darling white cloche!}

And, of course, the basket made from a lampshade she covered with chicken wire:


If you are like me, and you love what she has come up with, you can see more of it here, at Peony Wire Works. You can also find her Etsy shop here

And just to give you a heads up, at the beginning of January, I'll be hosting a giveaway of some of Erin's lovely wares. Let me just say, you don't want to miss out on this one! She has made some gorgeous things for this giveaway! :)

So again, a big thanks to Erin for her tutorial, and thank you each for visiting today! 

I will be back tomorrow with a cute children's craft idea, just perfect to keep the kids busy and happy during this time before the big Christmas weekend! 

Have a wonderful Thursday!

Blessings,
Jenni 

Sunday, December 18, 2011

Celebrating Advent {The Third Candle}


Happy Sunday to each of you! I hope it was a lovely weekend for you as well. :)

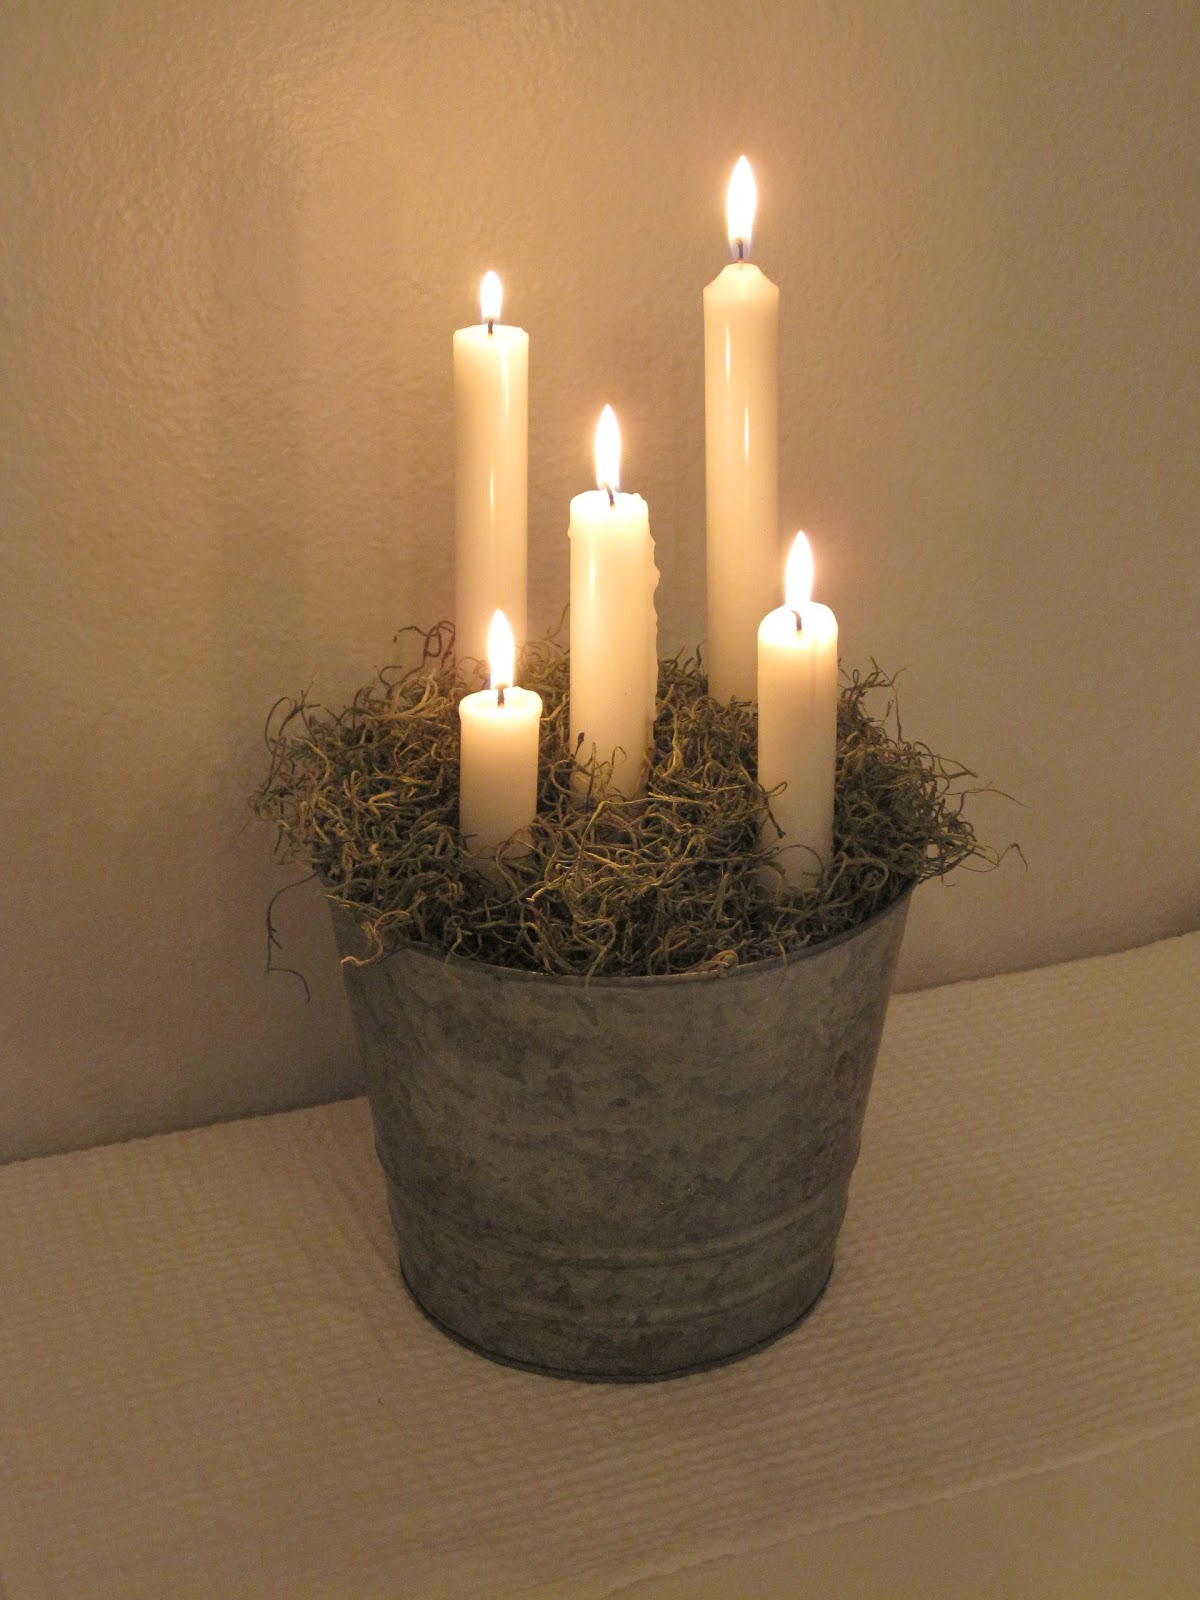
Today is the third week of Advent, and I finally got my little Advent arrangement put together. I say arrangement rather than wreath, because it isn't exactly in wreath form this year! 

I saw something so gorgeous on a friend's blog that I had to replicate it. With all my heart...Deborah made a lovely and unique combination of moss and Advent candles in a clay pot. You can see Deborah's here, on her blog banner...


 She simply used earth {dirt} in the bottom of the clay pot to hold the candles, which I thought was such a brilliant idea! I was kind of lame, and and couldn't convince myself to go outside to do it...Brrr! I ended up using a floral foam wreath, which I cut up into sections and arranged in my container to hold my candles. {I was using what I had on hand, but if I were to buy something for it, I'd have chosen regular flat styrofoam that I could have cut into a circle, and poked the candles through that...}

I did as Deborah had done, and added moss to the top, tucking it all around the candles...


I used a little galvanized metal pot for mine, because I was shopping at home! ;)


So, there you have it: Deborah's amazing idea for an Advent candle display {wreath}!


And now the candles are ready to be lit...Dim the lights...We light the first and second candle again. Then the third...{But if you are like me, you might get carried away and accidentally light them all! Oops!}

The third candle is The Shepherd's Candle.


"And there were shepherds living out in the fields nearby, keeping watch over their flocks at night. And angel of the Lord appeared to them, and the glory of the Lord shone around them, and they were terrified. But the angel said to them, "Do not be afraid. I bring you good news of great joy that will be for all the people. Today in the town of David a Savior has been born to you; he is Christ the Lord. This will be a sign to you: You will find a baby wrapped in cloths and lying in a manger." Suddenly a great company of the heavenly host appeared with the angel, praising God and saying, "Glory to God in the highest, and on earth peace to men on whom his favor rests." ~Luke 2:8-14

Oh, how I love the Shepherd's Candle! How surprised they must have been when that choir of angels appeared in the dark sky! And they didn't hesitate for a moment, hemming and hawing over whether or not to believe what they'd heard, or to do as the angel had said. They hurried to see the baby Jesus. Yes, maybe they were lowly and humble~ not at all those we'd imagine God would pick to tell such amazing news! But maybe this is just how He would want us to be: open and soft-hearted. Able to accept and trust that yes, this baby born that night is our Savior, Christ the Lord. 
 T
While shepherds watched their flocks by night,
All seated on the ground,
The angel of the Lord came down,
And glory shone around,
And glory shone around.

“Fear not!” said he, for mighty dread
Had seized their troubled mind.
“Glad tidings of great joy I bring
To you and all mankind
To you and all mankind.


“To you, in David’s town, this day
Is born of David’s line
A Savior, who is Christ the Lord,
And this shall be the sign,
And this shall be the sign.


“The heavenly Babe you there shall find
To human view displayed,
All meanly wrapped in swathing bands,
And in a manger laid,
And in a manger laid.”


Thus spake the seraph and forthwith
Appeared a shining throng
Of angels praising God on high,
Who thus addressed their song,
Who thus addressed their song:


“All glory be to God on high,
And to the Earth be peace;
Good will henceforth from Heaven to men
Begin and never cease,
Begin and never cease!”


 Thank you for lighting the third candle with me! I hope you have a wonderful night!

Blessings,
Jenni