Dear friends, My blog has moved!
Please visit me over at my new site!


I hope to see you there!

~Jenni


Monday, April 16, 2012

The $15 French Bistro Chair


Hello everyone! I hope you all had a wonderful Monday and that your weekend was good! :)

We had a quiet weekend, which I was thrilled about! Spring break was very busy with activities and sleepovers, and then, of course, it was Easter weekend~ so it was nice to keep things simple this weekend. :) I even got to work some on the girls' room, which was nice...

And speaking of the girls' room, I was so excited when I found these at IKEA a few weeks ago...I couldn't believe my eyes!


Then I looked at the price tag, and I almost jumped up and down right there in the middle of the store! But somehow, I remained {mostly} composed. ;) 


Well, they didn't look quite like this when I found them, but here is a before picture:


You see, like many of you, I love those sweet french bistro chairs. But the price of an authentic one is out of my budget this year, as they are often around 75 dollars per chair..There are just way too many things I want to do on our little home right now! :)

So, of course, when I saw almost exact reproductions for 15 dollars a chair, I bought three, planning to buy more if I could "antique" them up right!


I could see the girls using them as desk chairs in their room...bistro chairs have that beach cottage look to them, don't you think? ;) 
Now I had seen a post on making your own chalk paint, on Craftberry Bush. Lucy shared a recipe from Martha Stewart that she used on a chair that turned out amazing! 

So after giving my little chair a coat of spray primer, I gave this recipe a try...


Some things I learned about DIY chalk paint:

I found that this chalk paint was better if I only made what I would use in one painting session. Even by the next day, it was quite hardened, and even if I added water, it went on way too gritty, and didn't dry smooth. But if you find it is not smooth, you can sand it lightly after the paint has dried to buff it.


I also halved the amount of unsanded tile grout I added to the paint, and liked the consistency much better. So don't be afraid to play around with it a little until you find what works for you! 

Next time, I am going to spray paint the chair next time for a base coat, definitely the metal parts. I can still use chalk paint on the  wooden slats to get that soft, matte look. But now that I have found out how simple and affordable it is to make your own chalk paint, and how well it turns out, I will definitely be making more of my own!

Lucy from Craftberry Bush gives a couple of links to other chalk paint recipes as well in her post, in case you would like to check those out as well! I want to try out the other ones, just for the fun of it! :) 


Again, here is the chair before:


And after:


So, although antique chairs would have been my first choice, I am so happy with the results that I am going to be putting four of these around our dining table. I decided to keep this one in my room, and paint the other two I bought for the girls room...


{I am linking this to Coastal Charm's Nifty Thrifty Tuesday, the Weekend Wrap up Party at Tatertots and Jello, Frugal Friday at The Shabby Nest, and The Sunday Showcase Party at Under the Table and Dreaming.}


Well, that's all for me tonight! Thanks so much for coming by, and I hope you all have a good night! :)

Blessings,
Jenni


Tuesday, April 3, 2012

Finding the right robin's egg blue {The up front and honest truth}


Happy Tuesday to you, dear friends! I hope you are doing well, and having a good week so far! :)

I know I have been a bit scarce around these parts lately...We had a little crisis over here~ nothing at all life and death {thank goodness!} but enough to take some extra time and effort! :)

BUT, in other news, David and I finished putting up the bead board ceiling almost two weeks ago! :)

Yes, we got the whole {darn} thing up there...with a lot of help from this thing:


The Saturday before that, my husband hit his hand with the hammer WAY too many times to count just getting one 4' x 8' up, with both of us trying to hold it up....We voted to wait until the next weekend and use a nail gun!

Let me tell you, that was a good decision! It made such a difference! Now both the bead board ceiling and wall are up and primed and I am painting them, as well as the other walls...

The walls are to be white, and the bead board wall robin's egg blue. 

I would have never guessed it would be this hard to find the right robin's egg blue, but I really should have known better!


For me, finding the right paint color is very, very tricky. And no other but the just right color will do...


Along the way, I tried many colors in the attempt to find the right one, far, far exceeding my three sample cans rule...ahem...


...only to be left more confused and bewildered than I was in the first place...


And then I found THE color, but there was just one little problem...

I found it by painting a blue sample color on top of the greener shade that was already there. But it made the most gorgeous shade of robin's egg blue ever. A complex color that was neither just blue nor just green, but a wonderful blend of both. It was calm, yet had such a vibrant *pop* to it!

I tried mixing the two colors in different ratios, and came close. Close but just not quite right.

BUT then I found a Martha Stewart paint color at Home Depot, and it is the right color exactly! I think I need to try it at 50% or 75% of the color, though, and make it a bit paler...

*Edited to add: The name of the Martha Stewart color is "Enamelware", and Home Depot will make the color for you in their Behr brand paint. And have your heard of their Behr paint and primer in one? What a fantastic idea! 


 And I have help:


This little one wanted to paint with me for a while. She is very serious about it. :)


Here is a little peek of what we were working on, and it lets you see the color of blue a little bit.

And we have a theme: a beach cottage room it is! This I am so excited about, because it lets me decorate in a different way, which will be fun!

So things are looking up. We have a color, and we have a theme. :)


Before I close, though, I do want to apologize to you for getting so behind on my emails! I am trying to catch up, and plan on doing just that this week! :)

Thank you for coming by, and have a lovely night!


Blessings,
Jenni 


Thursday, March 15, 2012

Potted shamrock and a new wooden caddy


Happy {almost} Friday to you, dear friends! I hope you are well! 

I was shopping this week and saw this sweet potted plant:


I have decided that I love shamrocks.


 And I am loving the way it looks with this little wooden caddy I found at a nearly shop. :)


 I must confess to giving St. Patrick's Day only a nod of acknowledgement in the past, mostly due to my not placing much weight on the whole idea of luck.

Do you believe in luck?

On my way out of the market with my potted shamrock, a woman passing me said, "And the luck o' the Irish be with you!"

It was quaint and kind, and I said, "To you, too!", to which she chuckled.

But it left me feeling like something wasn't quite right.

And I realized that it reminded me somewhat of what is said in church each Sunday:

"May the grace of our Lord Jesus Christ be upon you", to which the people respond:
"And also with you."


To me, although I am sentimental and adore shamrocks and the festivity and fun of holidays, I prefer blessing to luck any day.


And I'm Irish. Yes, somewhere in the rather odd conglomeration of English, German, Danish, Native American, and French, there is also a wee bit of Irish in my ancestry! 


For some reason, I'm very proud of that. Not that I did anything to achieve it! ;)


So, is that why I felt compelled to buy this sweet plant?


 Not really. I just thought it was beautiful  It had to go in my cart!


I love the delicate white flowers in the dark green leaves.


So entirely spring, I think.

There is something about raw dark wood mixed with white.


Simple pleasures like potted spring plants make me smile...and remind me of a generous Giver who has blessed us so richly!


And lest you think I am a little bit of a naysayer, I am even doing a St. Patrick's Day post! {I am Irish, after all!}


But I still prefer the blessing:
"May the Lord bless and keep you. May He shine His face upon you and give you peace" to give to you in closing! 


Blessings, ;)
Jenni

Tuesday, March 6, 2012

Homemade Lemon Foam Soap


Hello sweet friends! How has your week been so far? I hope things are going well for you! :)

Well now...

If you have been reading this blog for a while, you know I enjoy trying my hand at home made cleaning supplies. What began as a deep and abiding love for baking soda and its many uses has become an addiction to coming up with new cleaning concoctions! It has been a lot of trial and error {sometimes resulting in streaky windows or soap residue} but it is so much fun succeeding with that "perfect" cleaner!

One of my new attempts is Lemon Foam Soap. Another is Lavender Foam Soap, and it is a toss-up which smells more lovely!


Even my older children somehow find it easier and less bothersome to use this soap! 

Note: I think foam soap may be the cure for the natural repulsion children have toward hand washing in general. ;)

At a visit to my natural products store, I discovered something new {well, new to me!}: castille soap. In reality, it has been around for a long time!


I saw a recipe there in a little leaflet for foam soap made with castille soap, but it said to mix the soap solution with water with a one-to-one ratio.


I tested it for a while until I came up with what I think is just right: not so much soap you will be rinsing it off for hours, but definitely enough for a nice, soft lather.


To make both the lemon and the lavender soap, I measured one ounce of the castille soap into this little measuring cup.


Pour the castille soap into your foamer bottle, and then add six ounces of water to that.


After this, I added ten drops of lemon myrtle essential oil, and gently shook the bottle a bit to mix.


To make the Lavender Foam Hand Soap, I followed the same recipe, except I used twenty drops of lavender, rather than ten.


The potency of each essential oil varies, and the lemon verbena is about twice as strong as the more subtle lavender. 


It is truly amazing what essential oils add to a cleaning solution, and this is no exception. The castille soap that I use, though unscented, actually has a scent of its own that is very pleasant. The foam soap will smell nice even without the essential oils; but oh! If you like your soap scented as I do, it takes a nice hand soap to wonderful!

A quick review of what you'll need in case you'd like to make your own foam soap:

*a foamer bottle {different from a pump bottle}
*castille soap, such as Dr. Bonner's, which can be purchased at your local Target or online at Amazon. Super Supplements has the lowest price for theirs, bought online, for $9 for 64 oz.
*lemon or lavender essential oil, or your own favorite!
*measuring glass, with ounce markings
*water


And that, my friends, is all it takes to make foam hand soap! Easy as pie. :)

*I am linking this to the Weekend Wrap Up party at Tatertots and Jello.


Thank you for visiting and I hope you have a beautiful Wednesday!


Blessings,
Jenni


Tuesday, February 28, 2012

A bit of spring and summer...


 On this chilly winter's night, I am thinking of spring. No, I am longing for spring! And for the countless beautiful colors that come with spring, as well as with summer!

I am quite partial to decorating with neutrals, but especially in the winter, I need a pop of color in my little cottage!

They remind me that my favorite seasons are just around the corner...


 A fresh bouquet of ranunculus bring thoughts of long afternoons spent puttering in the garden...


I like a touch of red in my kitchen...


It helps to cheer the room. :)


Red strawberries make me think of sunshine and lazy summer days...


And one red rose inside an aqua jar reminds me of Fourth of July, another lovely thought.


The aqua glass jars lend a little sparkle to a cupboard...


Soon it will be spring. The robin will visit my backyard again, just as it does every year.


Tiny buds on the trees outside will blossom...


and the flowers in my garden will return. It won't be long now...


I can almost feel the warm sunshine on my face...Are you ready for spring?

I hope you have a beautiful day! Thank you for stopping by and dreaming of spring with me! :)

Blessings,
Jenni

Tuesday, February 21, 2012

{My new little corner in the living room}

  
Hello everyone! How has your week been? I hope it has been good! :)

This past weekend was a little busy here, but we did manage to squeeze a few hours of work in on the girls' room.

My husband made a new larger window sill for the girls, and put up some thick trim around the window to finish it off. We got 2/3 of the bead board up on the wall, too, and will  finish the rest of it this next weekend. I'm hoping we can start on the bead board ceiling then, too. We've got a lot ahead of us, but it is a start!

Now for the new little corner in my house...


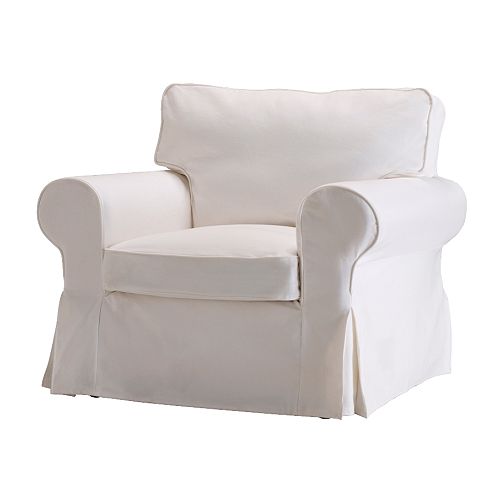
Do you remember how my sister and I went to IKEA a couple of weeks ago? Oh, we had such a blast, shopping and laughing. One mission of mine was to find a plain white duvet and some curtains {I found the duvet} and the other was to come home with the armchair I'd been saving for:


{IKEA's Ektorp armchair}


 But when I got there, I changed my mind and bought the Ektorp "Jenny Lund" instead. It is a little smaller, and just fits the living room better.


It makes me happy every time I look at it.


I finally realized I was never going to get around to making a slipcover for the horrid arm chair we had, and so I donated it to a local thrift store. {Thank goodness they actually took it!}


I am so happy with my new "corner" of the room now! I brought in a little end table my husband made for me years ago and tucked it beside the couch. Although it needs a fresh coat of paint, I like it in its new spot. 


{A little candlelight and I'm as happy as a clam!}

Now this room has a cozy place to curl up  for someone needing a restful moment or two. Now I just need to find the right basket for a few quilts, to place beside the chair...


Well, I hope you all have a beautiful Wednesday, and thank you so much for dropping by for a visit! :)

Blessings,
Jenni

Thursday, February 16, 2012

{Blue}


I am loving this color more than ever...

For years I had this gorgeous shade of blue with just a touch of lavender in our living room. Then I tried a grayish blue, which was also lovely.

{We'll skim over the two color mistakes of mustard yellow and bright green, and the very short-lived butter yellow...These did not work well in the living room.}

You see, I thought I was tired of blue.

But the funny thing is: I really wasn't.  In the end, I just replaced those particular blues with aquas in the rooms of my home...


And although I still gravitate toward the softer aqua hues, I must also admit a renewal of attraction to my favorite cottage blues...


There is just something so sweet and feminine about blue...


So simple and lovely...


And even the smallest touch of it makes me smile.


But I simply cannot leave aqua out of the equation...


And that is all right, because now I know that I don't have to!


Both are sweet colors, and both fit just fine in our little cottage...

I can have my cake, and eat it, too! ;) 
 
Now, why all this talk of blue exactly? I have blue on my mind, I guess.

More on just why next time! 


I hope you have a lovely, beautiful Friday, dear friends!


Much love,
Jenni

Photo Credits:
   5. {Beautiful Nest}
6. {Beautiful Nest}