
Today, we are so happy to introduce you to Erin from Like Grandma's, who is here to show us all her original homemade ornament! Welcome, Erin! :)


-Chicken wire(and wire cutters)
-Mod Podge(and applicator)
-Small shirt box
-Graphics of your choosing
-Clear glitter
-Ribbon of choice
-Spray paint(I prefer Rust-Oleum's Autumn Brown textured paint)
-Sharpie
Select your desired size of chicken wire. I like the five count, makes it nice and symmetrical, plus it it gives you adequate room to add topping graphics. You will need to leave the little pieces of the adjoining block so that you have something to hold your insert in.

Next, what I did to keep it simple is put a piece of construction paper under the chicken wire, mark my three outer points so that I know the inner piece will fit my cut chicken wire once I bend the outer pieces to secure the insert.


I then took my shirt box(who needs a ruler?? Any straight edge will do!) and connected my lines. Cut that out and try it under your chicken wire frame to assure that it will fit(you may find turning it to be helpful!)

Once you are satisfied that it will fit to your specifications, take the shirt box and trace your template on it.

I don't like to waste, so I did two on one box. Don't throw the scraps out!!! You'll need it. This was the point that I took the chicken wire out to the garage and spray painted it(Rust-Oleum's Autumn Brown textured spray paint). Went in cut out the triangles and then went back out, turned the chicken wire and gave it a go again.

Next, take your Mod Podge and your selected graphics(yes this is a recipe, a menu is under my finished project), Mod Podge the side of your triangle you want facing up(it helps to cut your graphic according to the side as well) and adhere your graphic. Fix that on and then Mod Podge the face of the graphic as well. I like the look of recipes and menus as my background, but you can use whatever you like.
Next, you'll want to choose the shape and size of your outer graphic. I chose a round piece(the top of the Mod Podge lid) to adhere to a picture of Santa taken from some wrapping paper from a couple of years ago.

Do the same treatment to it as your insert.

But while you are at it, sprinkle some clear glitter on it. Don't panic, it'll dry with a clear picture that's glittery!
Once your insert is done, put it in your chicken wire frame and bend the "arms" back. I did this with my fingers, but you can use pliers, if you do, cover your pliers with tape so not to take any of your paint off.

After your outer graphic is dry, take your outer piece and see where you want it. Then put some hot glue on the chicken wire where your outer graphic will go. Press your graphic in place and hold for a few seconds.(Sorry, no pic of that, but I only have two hands, where's a third when you need it??)

Since this is an ornament, it needs something to hang it by, so pull out some ribbon or string, or whatever your heart desires. You can tie it on the frame on the top loops or do like I did, make knots in either end of selected size and then just slide the arms that are folded down into the knots. You could hot glue that too.

Hang it on your tree and impress your family with how crafty you are!
Thank you ladies for the opportunity to share my love of chicken wire, hope the joy spreads!-ERin
Thank you so much, Erin! This is such a beautiful ornament! And she is on to something here with the chicken wire, folks!
Have you seen Erin's other amazing projects with chicken wire?
Chicken Wire Basket
Have you seen Erin's other amazing projects with chicken wire?
Chicken Wire Basket
 (Photo courtesy of Like Grandma's)
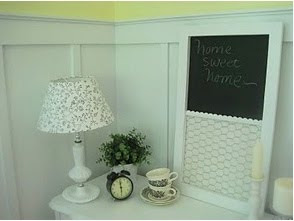
Would you believe this was originally a lampshade? She covered it with chicken wire and spray painted it, creating a gorgeous basket! How genius is that?
Or this:
Chicken Wire Soap Dispenser
 (Photo courtesy of Like Grandma's)
This is also her own inspired creation! {The cutest soap dispenser ever!}
SO...if you haven't met Erin before, make sure to head on over to Like Grandma's and say hello! She is not only very talented, she is also one of the nicest people you could ever hope to meet! :)
We hope you all have a wonderful weekend!
Blessings,
Or this:
Chicken Wire Soap Dispenser
 (Photo courtesy of Like Grandma's)
 This is also her own inspired creation! {The cutest soap dispenser ever!}
SO...if you haven't met Erin before, make sure to head on over to Like Grandma's and say hello! She is not only very talented, she is also one of the nicest people you could ever hope to meet! :)
We hope you all have a wonderful weekend!
Blessings,


.jpg)


22 comments:
Thank you ladies for honoring me with this opportunity! And thanks for the compliments! Love you girls!
Erin has assumed the title of a Chicken Wire God. {Love} this cute little ornament! I giggled through the whole thing. Erin, you need to learn how to hold the camera with your teeth & hit the shutter button with your tongue...will easily solve the third hand issue. Ha! Happy to see you over here my talented friend. Thanks for having her, girls!
Hugs,
Jami
The chicken wire Goddess has struck again! I love this project. I love Erin!!~ Nice post, and tutorial.
What a cute idea! You have some chicken wire talent going on over at your house. Love all your projects! Very fun!
Congrats on the guest post, too :)
xx,
Michelle
How adorable is this?? WAY ADORABLE!!
I especially LOVE the glitter part! lol
Lou Cinda
So cute!! I just love Erin's blog and her style is perfect!! I love me some chicken wire!! :)
treasures said...
Thanks for the tutorial!
You are very creative, Erin!
~ Julie
Great post - there is no one better than Erin when it comes down to Chicken wire!
Erin, you are the undisputed Queen of Chickenwire!
What a wonderful tutorial using chicken wire-Who'd thought? Well, Erin did and we are glad she did!
Love it all~
By the way-I posted your ornament on my blog today~Thank you! It's lovely!
Robin~♥
cool! I just need to cut a hole in my neighbor's chicken coop, and I could do almost anything! (Just Kidding) Just so you know, I am Jenni's son. :)
What a great ornament! I am a follower of Erin's, and love all of her creative projects! It would be terrific to make a banner out of a bunch of these!!
I L O V E anything with Chicken wire and have started decorating my kitchen with Roosters and yes some Chickens...Thank you soooo much for sharing your Chicken wire Crafts :)
I have never seen this chicken wire used so creatively, Erin is a genious, love her!
I love Erin's ideas. They are so completely orignial and gorgeous, and she's so unbelievably lovely and modest too.
I'm so glad you decided to feature Erin.
Sarahx
Thank you for featuring the very talented and creative Erin! What fun projects she shared with us today....Christine
This is adorable! I love it and am definitely going to have to try one. I am thinking this would be super cute around Easter-time too...
Fabulous Erin! Very creative.
Erin you are so creative! thanks for sharing.
So cute!
So beautiful - had to share on my facebook page!!
Post a Comment