Dear friends, My blog has moved!
Please visit me over at my new site!


I hope to see you there!

~Jenni


Sunday, September 30, 2012

Sneak peek {Wide plank floors}


Hello dear friends! I hope you are well, and that you had the loveliest of weekends!

Now I made a promise, one to show you a bit of those wide plank floors I put down in the girls' room this summer!

This was a huge project, but hands down completely and thoroughly worth it! I want to put these floors down in the whole house now!

I saw this idea at Frugal Farmhouse Design a while back while doing a search on painted plywood floors.


Like her, we also used a penny as a spacer between boards.


Some of my boards ended up more or less than a penny space due to the boards not being perfectly straight. But somehow they ended up looking okay...


They clean up easily, and I love how the white makes the room so much brighter than it was!


I have the baseboard molding in now, but you can probably see that their walk in closet isn't quite finished! I also have the corner wall trim left and all of their furniture to paint! It is embarrassing how long this room has taken!

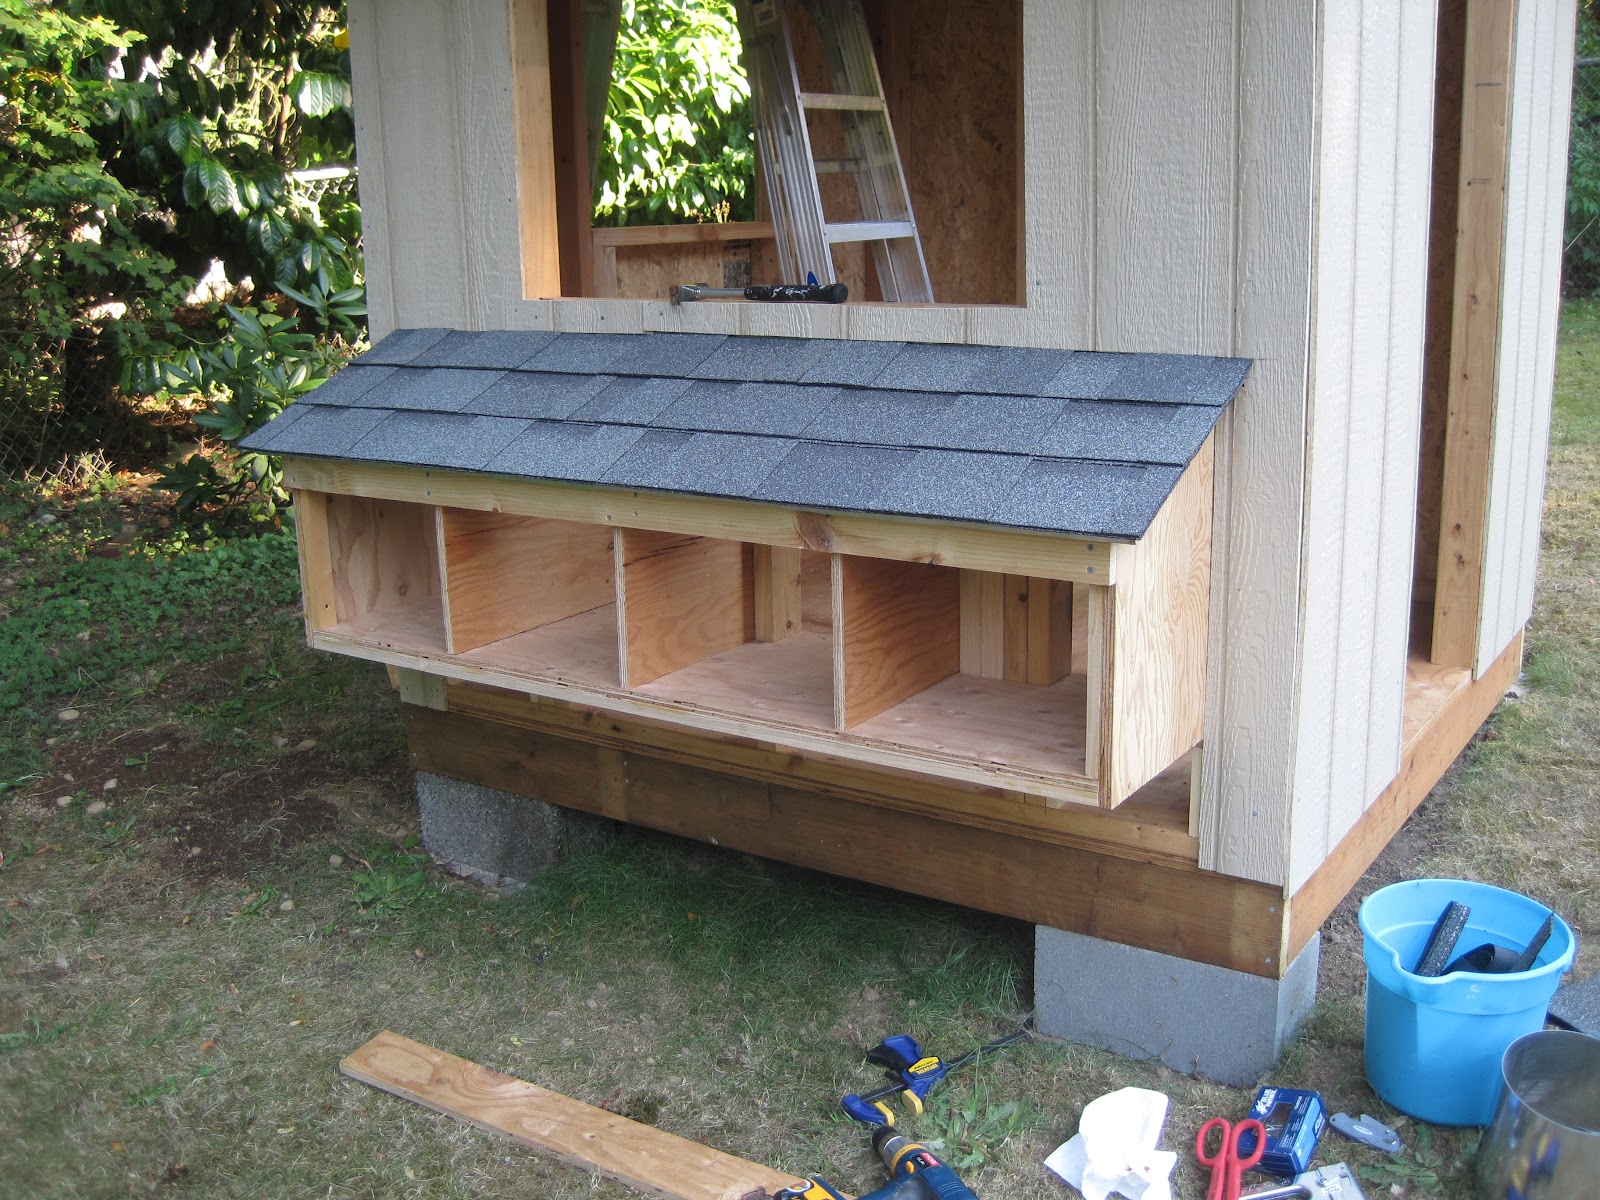
I've set the room aside for the next couple of weeks so I can really focus on the henhouse before the weather changes and it is too cold to paint! We should have our sweet chicks in their new home soon! I will be back soon with update photos of our progress, in case you'd like to see the little house! :)

Well, that is all for me for now! Thanks so much for stopping by for a visit!

Much love,

Jenni

Thursday, September 13, 2012

A little gift and a big project


So when I went out to feed the chickens yesterday morning I found a little gift...


Emphasis on little...Isn't it so cute?


I knew that a chicken's first eggs can be very small. And look at the difference between it and my store bought eggs! It made me smile. :)


But I am not sure which of our chickens laid the egg; this is still a mystery, although I have my suspicions! ;) 

But one thing I do know: we'd better keep on working on that henhouse, especially since I received two more eggs today! 

And what of that henhouse?


It is coming along, s-l-o-w-l-y but surely...

We still have some work left to do though...the inside walls {which will be plywood} and the vinyl floor {so much easier to clean I have heard!} and, of course, the windows and door...


We didn't realize quite how huge the front door would look and wish we would have done this a little differently and cut the door height down even more. But we are going to trim out a "triangle" of the top of the front of the house and put on scalloped shingles for visual interest...


David finished the nesting boxes yesterday, all but the siding and the vinyl on the bottom of the inside...here is it with the roof completed:


And the nesting box as seen from the inside of the coop:


The pitched roof will make clean-up easy, I think. I wanted to be able to stand up inside the coop!


Thanks to my parents coming out again this Saturday, we just might be able to finish it up this weekend! {Not including the painting of course, which is a whole other kettle of fish! And then, of course, David and I are onto the chicken run... 

And oh! Remember that other project I was doing this summer? The girls beach cottage bedroom? Well, it is almost done! What a lot of work this room was, but it is worth it to see it all coming together! 

{I will be back next time with a sneak peek of the white wood plank floors we installed in their room!}

I hope you have a beautiful Friday! :)

Much love,

Jenni

Wednesday, September 5, 2012

Hello, hydrangeas, and a little honesty...

                
Hello all! How have you been and did you enjoyed your summer? I hope it has been a wonderful one for you! :)

Confession:

I haven't posted for almost two months and my visiting has been on the slim to none side...I feel like the worst blogging friend on the planet! It wasn't at all intentional, or I would have done a "taking a break" post...Have you ever noticed that the longer you go without blogging, well, the longer you go without blogging?


With two enormous home projects in the works, it has been a little on the crazy side around here! 

My husband and I now know for certain that we can only handle one big project at a time! It doesn't matter if one is mainly his at this point {the chicken coop that has turned into more of a house} and if one is mostly mine {the wood plank flooring in the girls' room}!

I so hope you can forgive me the lack of visits and the absence of posts! I have missed visiting you all and seeing how you are doing. I realized I am the most happy when I am able to visit and write...


Now there is a bright and shiny silver lining to this summer, though: it has given me pause, time for reflection on what I am doing and where I am going.
 I know, I know. Time for reflection during a busy time seem like they wouldn't go together, but strangely, they did!

 And this is what I came up with:

 What I am doing: everything except for taking a little time to refresh each day.

Where I am going: in circles???


I am a mother of three children {two of them teenagers} and a wife to a wonderful husband. It was and is my biggest dream come true, the thing I most wanted, and I am holding onto it with both hands. 

I have realized, though, that when I was younger dreaming this big dream of having a family, I forgot that I would have other {smaller} dreams and a deep desire to create!

I feel like I need to do something about this dreaming and creating!

And what to do with those persistent dreams and plans tucked away safely for maybe someday

Maybe someday is now....what am I waiting for?


To answer my own question, I am afraid of doing any project or endeavor that would be hard on my family, because they are my first priority besides God. I don't to make a mistake and get myself in over my head.

Secondly, I have guilt. Loads and loads of it. And it is terribly hard for me to take time for myself without it joining me! ;) 

Does anyone relate to this?

I think I am {slowly} figuring things out...

So I have decided to start. To start truly working on these dreams instead of just thinking maybe someday or another day...A couple of these I shared a while back, regarding the changes I wanted to make with this blog, including a new name! 


I will be back next time to share these ideas with you, which I have to admit scares me a little! You don't scare me, don't get me wrong! It's the putting myself out there that makes me feel like it's my first day in eighth grade at a new school all over again, and let me tell you, that was frightening! ;) So I'm thinking compared to that, this should be a piece of cake, right?

Thank you, dear friends, for listening to me spill my heart, and have a lovely Thursday! :)

See you again soon...{really!}

Much love,

Jenni

Sunday, July 15, 2012

Lavender Lemon All-Purpose Cleaner


Hello friends! Here's hoping that you had a lovely weekend!

Tonight I want to share another cleaning product recipe, this time one for all-purpose cleaner...

Credits:
I have been making my own for a long time, but it still seemed like something was missing. Then while visiting the blog "The Grocery Cart Challenge" I saw that her recipe included Borax.  Maybe that was the missing ingredient! I gave it a whirl, and I have been adding Borax to mine every since! Our recipes differ enough that I am going to go ahead and share mine {including Borax of course, thanks to Gayle} and you can find her recipe here! She has many amazing tips for cleaning on the cheap, and advice on saving money on groceries. It is an amazing blog, definitely a must-read!


Now I am all about how things smell, and  making your own cleaning products is even more fun when they include essential oils...Truly, the options are endless...everything from cinnamon to rosemary to geranium is available. And don't be afraid to mix up your scents, adding two or three different oils you like. 


Here is my all-purpose spray, made with my favorite essential oils combo...but you can substitute/add whatever oils you prefer in their place. Some oils will be stronger than others, and this is the case with the Lemon Myrtle, which is much more potent than any lavender I have tried so far. This means I just need to add less of it than I would the Lavender, and it goes further! :)


Lavender Lemon All-Purpose Cleaner


One tablespoon Borax
Two cups hot distilled water 
15 drops Lavender essential oil
10 drops Lemon Myrtle essential oil
Three tablespoons white vinegar
Two tablespoons rubbing alcohol {an emulsifier; helps keep the water and essential oils mixed}
One teaspoon castile soap {I use Dr. Bronner's, which can be found at Target or Super Supplements} 


 First mix the Borax and the hot water in a liquid measuring cup until dissolved. When it has cooled a little, add the rubbing alcohol and essential oils and mix these in. Add in the castile soap and white vinegar and mix the whole concoction well. Pour into your spray bottle and enjoy using! 

*Remember to shake the bottle well before each use, as even with the emulsifier added, the oils and water still tend to separate a little! 

And there you have your own homemade all-purpose cleaner, at just a fraction of the price of what you'd buy at the store! 

Thanks so much for stopping by and I hope you have a beautiful Monday!

Blessings,
Jenni


Tuesday, July 3, 2012

Ah, summer...


...It is so good to see you again! How I have missed you! 


Welcome back, warm lazy days...


and long summer evenings curled up with a good book...


 source

The Fourth of July...


and meals eaten outside... 


Here's to pie made with fresh berries...


and glasses of cold lemonade...


source


source


Hurray for time at the beach...

source


And picnics in the warm sunshine...


Hello flip flops


source

and sweet, sticky popsicles

source

Goodbye schoolbus


source

and hello vacation!

 You see, we have our lists of things we want to do while you're here, and are going to soak up every gorgeous sunset


     and every single blissful moment...


I know it's been summer for almost two weeks now, but I still just had to do a summer post! I hope you don't mind! :)


I also hope that you are having a great week, and to my American friends, that you have a fun and very safe Independence Day! 


Much love,
Jenni


Sunday, July 1, 2012

Fourth of July Banner

So how are you tonight? I hope you are doing well, and that you had a lovely weekend! 

I am already ready for another weekend ;) and so I'm looking forward to Wednesday, one of our family's favorite holidays!

And speaking of the Fourth, I thought a banner was in order:


This is my little take on a lovely flag banner 
 Sweet Bee Hollow
made last year, which was my inspiration!


I used soft denim wash for the blue, and ticking for the stripes.


When I was hanging it up, my oldest daughter told me that the word "America" could be on the banner, because there were enough flags for each letter.


I hadn't thought of that, but it did get me thinking how cute it could be to stitch the letters on the banner, if you wanted a word! I think I might have to try this!


Now if you would like to make this project you will need:


Red and white ticking
Blue denim of your choice
Lace embellishment
jute twine
stitchwitchery to bond two fabrics together
stitchwitchery {Pellon 808 Craft Fuse} to give fabric strength and body
glue gun, glue sticks
iron
sewing scissors
craft scissors


First cut your ticking rectangles in the sizes you want. I made two different sizes for mine, but you can do yours however you want. :)


Then cut the "craft fuse" stitchwitchery,  making it about a fourth of an inch wider than your ticking on all sides. With the ticking on top of the stitchwitchery, iron them on hot until fused together. {This will only take about a minute.}


Cut your denim rectangle to about half the size of your ticking rectangle, then cut your other stitchwitchery {the kind that bonds fabrics together} with a little extra on the sides and enough on the bottom for your lace.


Add your lace and cover the denim/lace with a damp cloth and iron on hot until fused.


Trim any excess off all the sides and you have a flag! 


 I glued twine to each side of each flag until they were all strung together...


...and hung it up adding a little twine bow to each side to pretty it up. :)


And there you have it, a banner to celebrate the Fourth of July!

I am linking this to Tatertots and Jello, Freckled Laundry, It's Overflowing, and Under the Table and Dreaming.


Well, that's all for me tonight! Thank you so much for stopping by and I hope you each have a good night and a beautiful Monday!


Much love,
Jenni


Thursday, June 21, 2012

DIY Beach Cottage Lamp


Hello sweet friends! I hope you are all doing well!

This week is just flying by, with all of the end of school activities and getting ready to go on vacation...

Summer is officially here! And so I guess it's fitting that I am {still} working on the girls' beach cottage bedroom...

I'm crossing my fingers that the room will feel like a relaxing beach retreat, with soothing aqua blues and pure white walls.

Here is a little something my husband and I made for their room:


It is our version of a clear glass lamp base found at Target, which is made to put little collectibles inside...Michelle from Emerald Cove has the Target lamp, and hers looks amazing filled with beach finds...so this got me thinking...


Could I DIY this lamp base and save a little bit of cash?
 
I wanted one that looked a little less modern for the girls' room...


The tricky part was finding a jar with a lid that was big enough. Years back we made lamps from canning jars, but I wanted something a little different this time. I found one I liked, and had a lid that would work, but the girls vetoed the jar! ;)

However, I found this jar at IKEA, and yea! It was big enough and it came with a lid! And this time, the girls approved!


{74 oz. Burken Jar with lid}


A quick trip to the home improvement store yielded a simple light socket and an extension cord. David drilled out the rivets with a small drill bit to remove the handle so the light socket could fit there instead.


He then drilled a hole in one end of light socket for the extension cord, putting a grommet in the hole and wiring it up. He drilled another hole in the middle of the lid for the light socket and bolted it to the lid.


{You can see the black grommet at the back of the light socket where the extension cord comes out.}


I filled the jar with sand, adding driftwood and miniature sand dollars in the jar for a little beach scene. {First I tried having these purple shells inside, but it didn't look right.} I put the lid back onto the jar, screwed in a light bulb, and we had a workable lamp! 


I covered a Target lamp shade with white linen, adding a ruffle at the bottom. The ruffle was not cooperating ;) and it is by no means perfect! 


{If I were to go back I would perhaps use a smaller shade with a smaller ruffle so that it shows more of the jar...I will do this next time!}


Thank you so much for stopping by and I hope you each have a beautiful weekend!

Much love,
Jenni

I am linking this to: