Happy Sunday to you!
Was your weekend a good one? I hope it was!
I want first to thank you for your comments on my last post~ they each meant so much to me! They truly did motivate me this weekend, and we got a lot done on the master bedroom. I feel so much better now, even about the plank ceiling! Somehow, it looks better to my eyes than it did before! So thank you for the extra push in the right direction! :)
Secondly...

Since I am finally in the mood to finish up projects, {wink} I decided I might as well finish this little project, too...Something else I'd started weeks ago, and not finished...

Since I am finally in the mood to finish up projects, {wink} I decided I might as well finish this little project, too...Something else I'd started weeks ago, and not finished...

Partly because I am a perfectionist,
{I hear you say, "No,really!?"}
and partly because I wanted to get the doily flowers right...
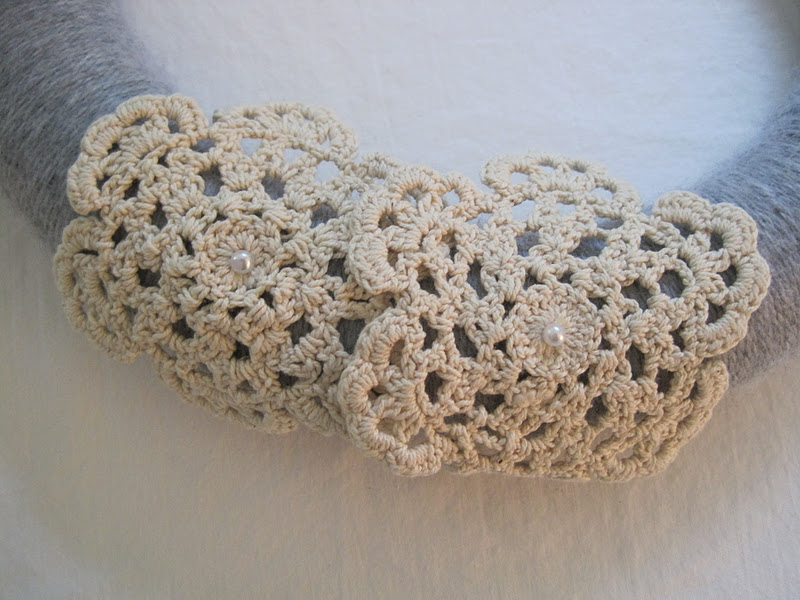
{pearl corsage pins hold the first two miniature doilies in place; they were put in an angle to avoid any sharp points poking out!}

{one doily flower}

{a straight pin pushed down in the center of the "flower" holds it firmly in place, and a corsage pin was used next as functional decoration}

To start, I just used a white styrofoam wreath form, and wrapped the yarn around and around until it was covered...just as you would with any yarn wreath. :)

{I realized this would be a good thing to do when watching a movie...}
I decided where the lace that would hang the wreath would go...hot glue works great for this!

And also decided I wanted my "flowers" off center on both sides.

Something about the warmness and sturdiness of the yarn with the delicate crocheted pieces just complemented each other...

Now I must confess...after repainting our living room last winter, I am still in the process of decorating the walls/deciding what I want! SO...I cheated a little here by only really showing the wreath by itself. This room is definitely a work in progress!

I will be back tomorrow with a little tutorial on making the doily flowers, just in case any one would like to make one!
{I am linking this to:
The Sunday Showcase Party at Under the Table and Dreaming
Air Your Laundry textile party at Freckled Laundry
The Weekend Wrap Up Party at Tatertots and Jello
Frugal Friday at The Shabby Nest
I hope you have a wonderful night, and a lovely Monday! :)
Thank you for stopping by~
Jenni