Dear friends, My blog has moved!
Please visit me over at my new site!


I hope to see you there!

~Jenni


Wednesday, September 28, 2011

More Monogram Art {Framed Doily Monogram}


Well now...where were we? Oh yes...

The last time you stopped by for a visit, I showed you my Glittered Monogram Wire Art. And I promised you more monograms, remember? Well, I have another for you! This one is my sister Belle's idea, and I had fun making it!


{Framed Doily Monogram}


I spray painted another canvas frame, only a larger one this time. {I used the 10 inch size.} In the previous post, I talked about using canvas frames, and you can see that here. :)

I chose a doily that would fit over the entire back of the frame and spray starched the doily. I wanted it to have some stiffness to it! After it had dried {I used a good amount of spray starch to get the stiffness it needed!} I stapled it to the back of my frame.


  {cutting off excess doily}


{all loose ends stapled}


I added a loop of cotton lace ribbon to the middle top on back. I wanted a sweet and dainty way for the frame to hang up! :)

{I kind of overdid the staples for one tiny ribbon loop, didn't I?}

Now for the glittered letter...

I didn't have the right sized letter, let alone one with a pleasing style. SO...again, I just made my own.

I simply printed out my letter in the font 
and size I wanted and cut it out. I then traced it onto chipboard. 


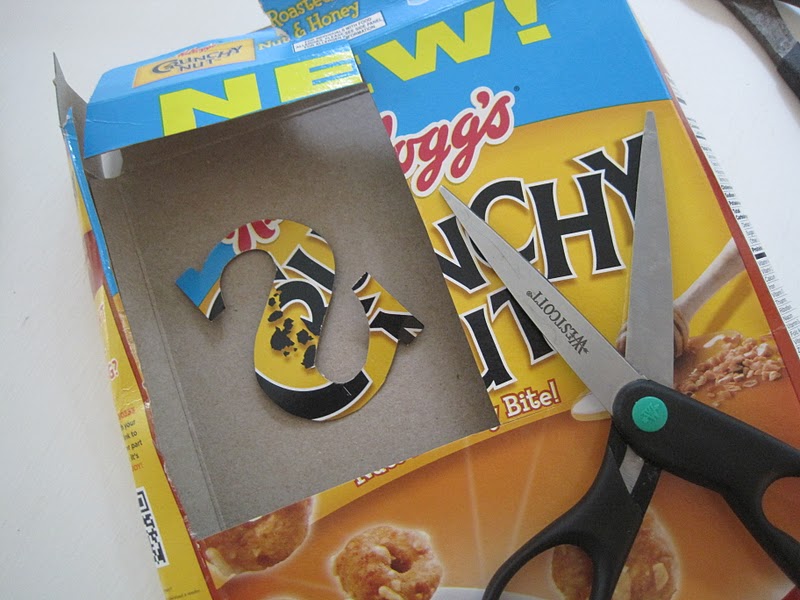
Now I must pause here, and tell you something I found out recently while visiting the blog, c.w.frosting. Caroline had a fantastic idea to use a food box, for example, instead of chipboard. I did this with the previous monogram. But I didn't know about that then, when I did this letter. {I did this letter first.} So I struggled to cut the ol' chipboard, but from now on, I'm a cereal box kind of girl!

If you are using chipboard, you will need an exacto knife or a craft knife to cut the letter. I liked the craft knife more. Until the blade broke off, with the other part of it still attached. And no way to remove it. OR replace the new blade! SO I brought back out the exacto knife! ;)

After cutting my "S", I glued and glittered it with my favorite color of glitter, giving it time to dry fully. 


{glitter: Martha Stewart Crafts, color: hematite}

I glued it to the doily, centering it evenly.


 Now I used my handy dandy glue gun, because I didn't want it to be permanent. But regular Elmer's glue works wonderfully to attach these letters to doilies, and is definitely a much more permanent way to do it!

 And there you have it!


 To make this, you will need the following:

Canvas frame or frame of your choice
Doily 
Staple gun
Spray starch and iron

Chipboard or dry goods box for letter
Glitter
Elmer's glue or glue gun
Exacto or craft knife
Scissors
{or precut/preglittered letters}


 Coming up next: Here's a clue...When I made this little framed monogram from the last post,


I knew I was going to have to make more of them! Stop by tomorrow to see what I'm hinting around at! ;)

I am linking this to the following parties:

The Weekend Wrap up Party at Tatertots and Jello 
The Air Your Laundry textile party at Freckled Laundry

The Saturday Nite Special at Funky Junk Interiors
The Sunday Showcase Party at Under the Table and Dreaming

   I hope you all have a lovely Thursday, and thank you stopping by! :)


Blessings,
{Jenni}


Monday, September 26, 2011

Monogram Art {Glittered Monogram With Chicken Wire}


I hope you had a lovely weekend, and found time to do something you enjoy!

I have been busy monogramming. :)

Like many of you, I am loving monograms...Something about them is so endearing and romantic.

And I have a few unique monogram ideas that I will be sharing with you this upcoming week!

First up is: 


Glittered Monogram with Wire Art

This was a fun craft to make, and actually a pretty simple and inexpensive one as well.

{Most of the time it took was spent deciding what frame to use, what color to paint it, what size of letter, and so forth. You know how it goes!}

I wanted a square frame, which are not as easy to find. But that was okay, because I had a plan:


Enter canvas stretch frames


You fit them together by sliding one of them into the next, into the notches on each end,


but it can be a little tricky getting them to fit correctly. I used a square to make sure it was, well, square and adjusted it as necessary.


I just tapped it lightly into place here and there with a hammer. I used a small block when I hammered so I wouldn't dent the frame!

As you can see, these frames are not meant to be perfect, and mine definitely wasn't. But I wanted a slightly shabby look, so I was happy. :)

I spray painted it {Valspar white in flat} 

and cut chicken wire first to approximate size.


I left a little room at what would be the top for a picture hanger holder, and trimmed the excess off with wire cutters.


After this, I stapled the chicken wire into place.

{Have I ever told you how much I love my staple gun? It is right up there with my table saw and glue gun!}

At this point, I stapled my ribbon on the back, on the top middle of the frame. I had originally left room for a hanger holder thing, but one was no where to be found. ;)


If you do have one, you can loop the ribbon through the "holder", if you like!

Or you can opt out of the ribbon entirely and simply prop it up against a wall or on top of a fireplace mantel:


Now I had chosen a small "frame", the smallest size offered actually, which is the 8". {I know, the picture shows 10" ones, but I forgot to take a picture of the 8". Oops!}
 To get my glittered letter, I traced a letter I already had onto a cardboard cereal box and cut it out. 


I was cutting letters out of regular chipboard,  which is what I did with the next monogram craft I'll be showing you, but it was so hard to cut, even with an exacto or even my craft knife! 

I got the idea to use a box instead from a wonderful post at c.w.frosting, on making chipboard letters. I was actually able to cut the letter out with scissors! Then I actually used my nail file afterward to smooth and round the edges of the letter, so you couldn't tell it was cut! Sounds crazy I know, but it worked! :)

A little Elmer's glue spread on top of the letter with a foam brush...


...and my favorite dark blue glitter {brand: martha stewart, color: hematite}.

To adhere the letter, I used my glue gun and centered the letter, pressing it down lightly for a bit.
And then it was done. :)

If you would like to make one for yourself, this is what you will need:

frame of choice
carpenter's square
spray paint for frame
chicken wire
cardboard dry goods box {or a pre-made glittered chipboard letter}
your favorite glitter
Elmer's school glue
glue gun
staple gun
hammer
ribbon 

I love anything glittered.


I love that this project was practically free, because I already had most of the supplies on hand.

I love monograms.


How about you?

I am linking this to the following parties:


The Sunday Showcase Party @ Under the Table and Dreaming
Saturday Nite Special at Funky Junk Interiors

Have a beautiful Monday!

Blessings,
Jenni

Monday, September 19, 2011

Crazy about clean! {Make your own Lavender Scented Glass Cleaner}


 SO...I think it is safe to say that, if you know me, you know I'm crazy about clean! {Sometimes so much so, I practically drive myself crazy trying to keep everything tidy. Which with a family of five can be...challenging, to say the least!}

Not that I'm complaining or anything.

;)


{Country Living}


But seriously, when I shop for a cleaning product, I mean business. It has to stand up to the test. It has to kill germs and make things shine. It must be people friendly. And it absolutely has to smell good.

In this quest for good cleaning products, I have turned to some good old basics, such as baking soda, and am also having fun making my own.

You might be surprised at the every day products you have in your own pantry that, put together, would make a wonder cleaner! 


And let's face it, don't we all love cleaning with something that smells delicious? Ah yes...scents such as lavender, mint and lemon come to mind. And that's where natural essential oils come into the picture, filling the room with a lovely scent while you clean.


 Now I was given a recipe for homemade glass cleaner, but found it needed a little tweaking here and there. I used my favorite dishsoap {Mrs. Meyer's lavender scent}, and increased the amount of it used, from 1/2 teaspoon to one tablespoon. This made it so much more effective! 


I also added one teaspoon of lavender oil to mine. Just because. ;){However, you can add whichever essential oil you like most!} 
I love this recipe for glass cleaner, and the way my mirrors and windows look after I use it!


Lavender Scented Window and Glass Cleaner:


Two cups water
three tablespoons vinegar
one tablespoon dishsoap 
one teaspoon lavender oil

In a large liquid measuring cup, mix all the ingredients together


and pour into a clean spray bottle.


Use and enjoy the clean results! ;)

I hope you each had a lovely weekend, and that your week is off to a great start! Thank you so much for stopping by! :)


Blessings,
Jenni

Friday, September 16, 2011

Ruffled Linen Garland {And Tutorial}


Hello lovely friends! 

How has your week been going? I hope that it has been a wonderful one! Is it just me, or has this week just flown by? But that's good, right? This means we're almost to the weekend! :)

This week I carved out some craft time, and got to work on something at the top of the list: creating a linen garland. Last fall, after making the Linen Wreath {here}, I tried my hand at a garland made from linen strips. However, stringing it onto twine {my first thought} did not work. My second thought was to use jewelry wire, and this did work, and this method used the same technique as to make the linen wreath. It just took me until now to get back to it. I know, how lame is that? ;)


Ruffled Linen Garland 


As with the linen wreath, I began by tearing strips of linen, about five or so inches wide. I found when I tore it versus cut it, the edges curled a wee bit, making it fuller and ruffly.   
To make tearing the linen easier, I cut in a couple inches first.

Next I used an awl, which is pictured below; it is the small tool on the bottom. {The other tool is a pair of wire cutters.}


Starting at one end of each strip, I began making holes in the linen with the awl, spacing them about an inch or so apart. They do not need to be perfectly evenly spaced, and as you can see, mine sure aren't! ;)


At this point, I started weaving my linen strips through the holes,


and scrunching up several folds at a time before sliding it down the wire, and weaving more of the strip on.


I continued this until my garland was right length, then shaped the wire ends on each side into hooks to hang the garland. 


 {I used thumb tacs on the top of my mantel to hang the garland from.}

 I twisted the ruffles this way and that until I got the the look I wanted. 


After it was hung, a little more tufting and twisting...


until it was just right. :) I also added a lace ribbon to each side...

Now if you would like to make your own ruffled linen garland, here is what you'll need:

awl
wire cutters
12 gauge jewelry wire
linen or linen look-alike
fabric scissors
decorative ribbon for ends {if desired}


Now if you like this ruffled linen look, you might like the linen wreath I made last fall:


You can find that here if you like! :)

I am linking this post to:
{Air Your Laundry Friday} at Freckled Laundry
Frugal Friday @ The Shabby Nest
Weekend Wrap Up Party @ Tatertots and Jello
Feathered Nest Friday at French Country Cottage
Saturday Nite Special @ Funky Junk Interiors 
The Sunday Showcase Party at Under the Table and Dreaming 


I hope you all have a good night, and a beautiful Friday! And, as always, thanks so much for coming by! :)

Blessings,
Jenni