
Hello lovely friends!
Tell me, how was your weekend? I really hope it was a wonderful one, and that today was a nice Monday for you, too! :)
I have something to show you, but before I do, I just wanted to say thank you. The comments you all left on both the bathroom and the kitchen post floored me. They are beyond kind and beyond encouraging, and I was so touched.
You see, I realized once again I have met some truly kind people. And that is such a blessing! So thank you for everything. I really, really mean that.
Now...
I wanted to do a banner for the fourth of July, something fun and patriotic. And although most of the colors I use in my decorating are really considered neutrals, I needed this banner to have a little red and blue! :)
And this is what I came up with:


{I just love the fourth of July!}
But even if you are not American, this banner idea would work for any holiday or season~ with or without letters! :)
To make this, I collected my supplies:
Decorative scrapbook paper
Twine
Matching neutral scrapbook paper
*Book pages {or make your own!}
Glitter letters
Glue stick
School glue, such as Elmer's
Glue gun, glue stick
To make the banner, I cut a piece of scrapbook paper in half.
I folded it accordian style, from top to bottom...

...and on one side of the folded paper, bring the two ends together, like so~

Using your hot glue gun {or other glue}, add a line of glue between the two ends that meet and close the ends.

Now, at this point, there are two different ways you can finish it. It all just depends how you want it to look. If you want wider spaces between the folds, you will need less folds; otherwise use more. I typically used between 24- 26 "folds" to make one.
Most times I had to use two halves of a piece of scrapbook paper {folded} for one to get the full look I wanted. But I will show you both ways, so you can do it whichever way you prefer! :)
If one half piece of paper is enough,

all you need to do is bring the other side together and glue it the same way you did the first.
If you are using two halves, fold the second half of paper accordian style as you did before. Repeat the process of gluing one side of the paper together.
You can play with it and decide if you want to keep all the folds or cut some off, all again depending on what you like!

Now when you have it ready to put together, take the end {unglued} fold of one half and place it over the other unglued end of the other half.

Does it look just how you want it? Yea! Now just glue them together and press until firmly adhered.

Next, put a dab of glue in the middle of each of the three center folds, like in the picture above, and press together.
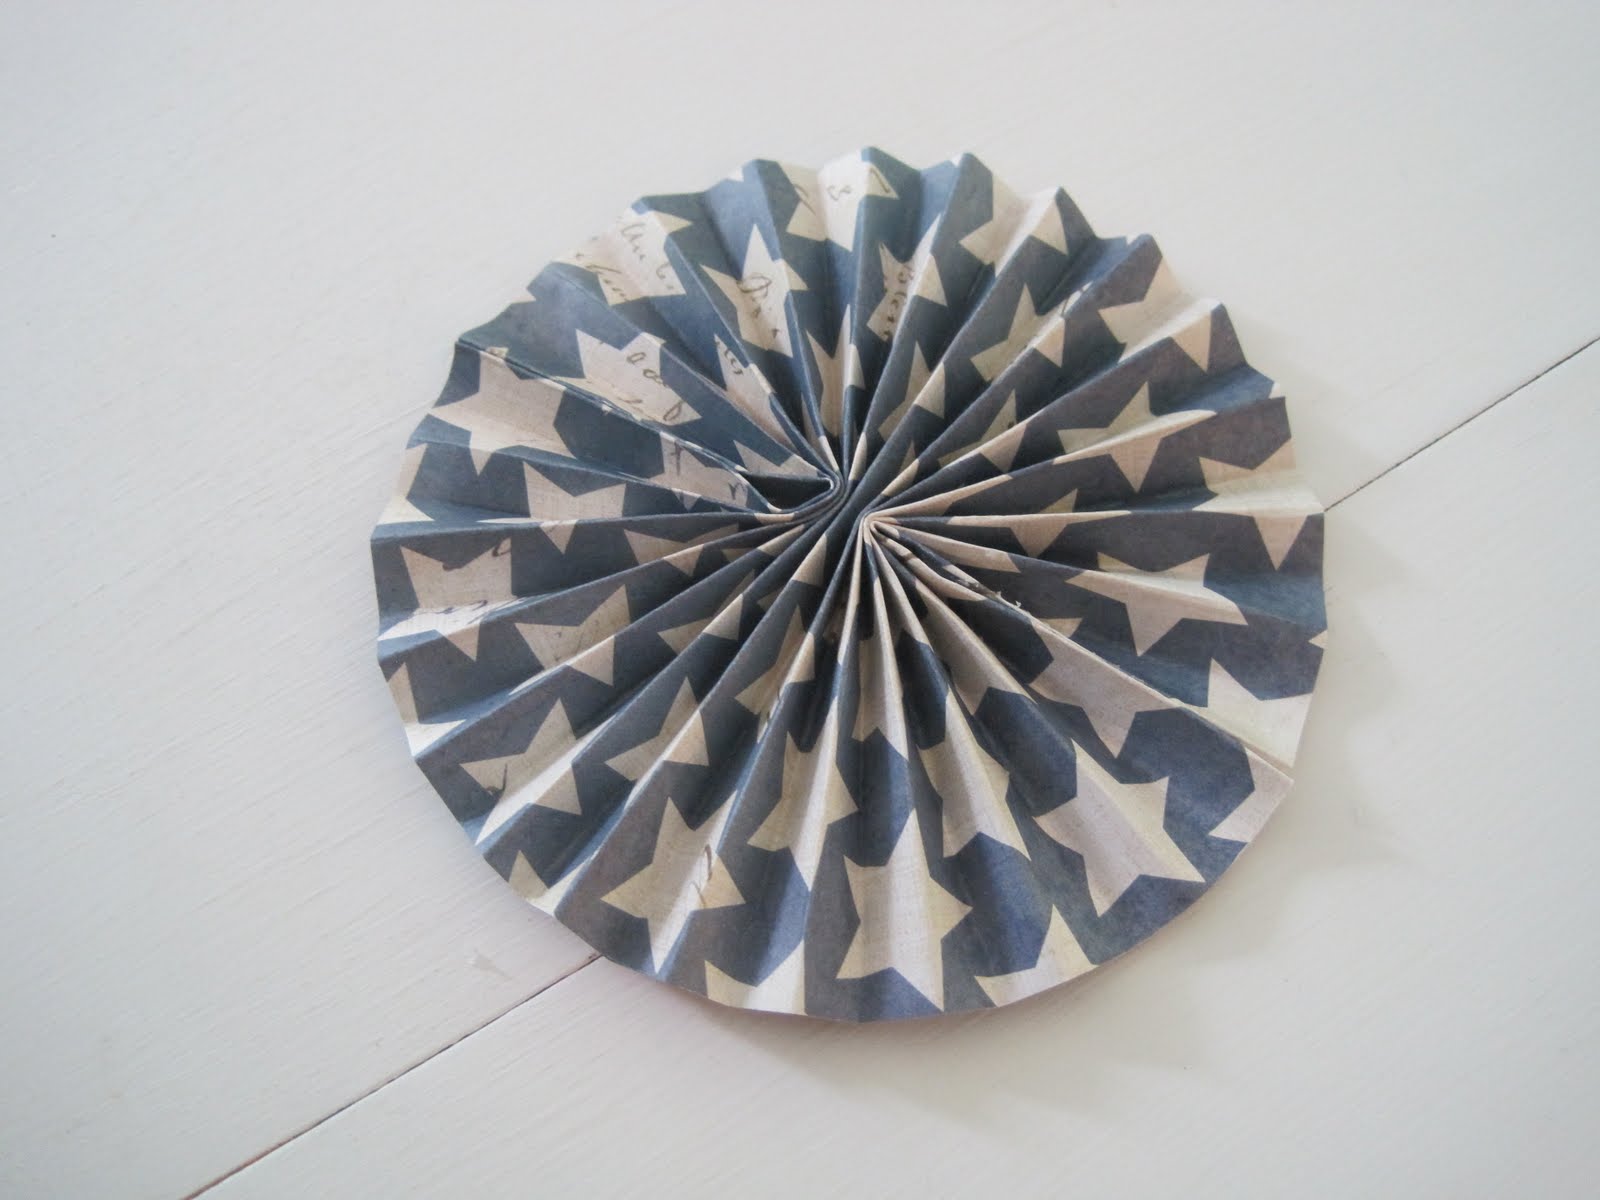
And there you have it! Your base "accordian circle" (for lack of a better word!) for your banner.
Now I was putting letters on each piece, and I thought it would be fun to use a book page for a circle to glue the letter to. Something with words like life, liberty, and the pursuit of happiness on it. But I didn't have anything like that on hand, so...
I made my own "book" pages! I found a free copy of the Declaration of Independence text online and copied and pasted it into Word Document. Changed the font, and printed it.
I made a bowl of nice, strong black tea, and used a small paint brush to "paint" the paper with tea.

I did that a few times until it was the shade I wanted and let it dry, and cut it into the size of circles I wanted. {I used a can of kidney beans to trace around for my circle template, so anything will work!} ;)

{I glued these circles to neutral card stock for extra firmness.}
Then I used these circles for the center piece, gluing the glitter letters onto them. I glued those onto my "accordian circles". {Is there a real name for these things?}

I strung a piece of twine from one side of the mantel to the other, and clipped each "letter" up with a tea-stained clothespin.

{The tea-stained clothespins were a great idea I got from Nancy's Tidits.}

And now, my mind is spinning because whenever I do one craft it always leads to another. In this case, three! Here's what I am working on now:

{More on this to come!} ;)
Well, that is all for me tonight! Once again, it's a novel for you to read! I'm impressed if you made it this far! :)
I hope you have a restful night, and thank you very much for visiting! It was so nice of you to drop by. :)
Blessings to each of you~
Jenni
{Sparrow}
I am linking this post to the following parties:
The Sunday Showcase Party and the Celebration Inspiration Party at Under the Table and Dreaming, The Trendy Treehouse, Cherished Treasures, Funky Junk Interiors, and Tatertots and Jello.


.jpg)


19 comments:
I LOVE your banner! It would suit so many occasions, I am going to set my daughter up with making one as a holiday project! I love those patriotic colours you have chosen too! I saw a vintage American flag in a store yesterday, and wish I bought it now, (i am going to have to go back for it!) I could wave it on the fourth and think of my gorgeous American friends like you!!!! X
Fabulous banner! Thank you for the tut of how to make such cirkular paper foldings or what ever to call it.:))
Love your new kitchen as well. melted completely when I saw the sink picture. Aw.. Fabulous floor. That must have been a lot of work but the result is wonderful.
Hug from Norway.:)
LineCathrin
OMgoodness, You're so clever! This banner is absolutely gorgeous! When I was just looking at the banner, before I had read the post, I was floored that I was reading parts of the Declaration. I couldn't believe it. You are so clever! I love it! Would you mind if I featured it tomorrow? It's just so perfect for this week :)
Miranda
www.justdrinkacoke.com
This is so cute! You are so creative my friend and how cool that you used the Declaration of Independence! Love it! I hope you enjoy your holiday!!
xoxo
Miss AMERICA (Jenni)
Girl you have created an american beauty of a banner, it sure beats those plastic Red, White, and Blue flags and banners at a dime store :)
This is a perfectly perfect for any 4th party!
come see my wedding cake post you will be shocked!
xoxo
Dore
Very pretty banner! I love it. :)
That is so cute Jenni. I don't think I have time to make one for the 4th but maybe one that says summer. Thanks for the tutorial.
Hi Jenni,
I love the paper you've used to make the lovely banner. Isn't it gorgeous? The whole banner is gorgeous, of course, but that's my favourite part. I always think the choice of materials makes all the difference. Do you know what I mean?
Anyway, I hope you have a wondeful 4th July celebration!
Sarahx
I just love the way you have made those accordian folds. The 4th July is a significant date to my husband and I (here in Australia). It is our Wedding Anniversary! Perhaps I could surprise him with a little Anniversary banner.
I hope you have a wonderful 4th July celebration Jenni. ;)Sharyne
Your banner is so pretty!!! Thank you for posting my Giveaway on your blog and your sweet comments...I am your newest follower. Your blog is beautiful and in my favorite faded patina of whites and greys. Sea tidings, Kerrie
They are beautiful Jenni!
Happy 4th of July!! Enjoy!
Your mantel looks perfect :)
Deborah xo
Jenni, if this just isn't the cutest banner I don't know what is, I absolutely love it, wish I were as creative!! Happy 4th to ya!
xx devon:)
Funny! I tried to make these today for a party I'm doing and it was a major fail. But now I got it! thanks :)
Your banner looks amazing...found you through Tatertos and Jello! If you get a chance, stop over and link up at my party going on this weekend!
Love this! i was planning on making one of these today- thanks for the inspiration! I love how you used the Declaration of Independence on it!!!
Beautiful banner, Jenni! Your tutorial was easy to follow too. Not sure if there's a name for those but "accordion circles" worked just fine for me!
Hey Jenni,
Your banner is just beautiful. Thanks so much for sharing how you made it.
You are such a talented, gifted lady.
I have done a similar craft
(http://blestnest.blogspot.com/2011/02/valentine-tussie-mussie.html) with the pinwheels (aka accordian circles) and it was a lot of fun and very satisfying. Any tips on keeping the folds a uniform size?
This is so beautiful! You did a fantastic job. I hope you will link this up to my Patriotic Project Parade!
http://www.itsybitsypaperblog.com/2012/06/patriotic-project-parade-linky-party.html
Post a Comment